
Forum Replies Created
-
AuthorPosts
-
Paul, yes, got the house #. i have all the original packing, so will send back as received, if not more. i have some of those styrene-chips i can fill the box with too or an extra layer of card? Don’t worry.
My hinges have sufferred, quite badly pitted chrome and mostly damaged/threaded. They want replacing, but as interim, I retapped the M7 to clean up a bit, salvage what i could and refitted studs with retaining compound. hopefully takes up any slack. Those M5, i had bolts, but again damaged. Re-tapped and fitted small studs made from some SS threaded-bar.
yeah,, one came off OK. The other, no way. i had to pry the trumpet off to access the mountings and take the whole panel assembly off and cut/grind the fastener off.
Peter, my limited understanding on the whole isocyanate affair is that it is in the activator and applies to acrylic & polyurethene 2-packs? But i’m unsure, you quite easily get confused and overwhelmed reading around the subject. Am i right in thinking it gives that ‘pear-drops’ smell thats the nasty stuff, volatile organic compound is it?
The paint i’ve used for my car, and will do when i end up respraying the bloody thing is HMG 2k manufacturer. I’m unusre what the actual base is, i think it’s polyurethene.
I use a carbon-cartridge filter mask when i’m painting with whatever i’m using. We make our own choices. I feel the odd paint job here and there it is satisfactory. Spraying everyday, all day, yeah, air-fed mask is required. What is it; ‘occupational exposure levels’?
I’ve done a limited amount of painting in my life thus far. First ‘car’ i sprayed i did as a young man. About half a dozen vehicles and a few motorcycle in total over the last forty years or so, celly, poly, acrylic, epoxy, whatever. All diy paint jobs, some in a large industrial unit, home garage and even outside. Not a lot by any stretch. I’ve probably consumed more harmful poisionous crap as a smoker, breathing industrial/town/city air and whatever else in the last half a centruy-plus than in my painting history?
Be interesting how you get on with your LVLP gun? I have seen lots of HVLP guns, not so much the other way? Probably like you, i have a 14cfm ‘rated’ compressor, but will be less. I have a 10m hose, 10mm bore i think. Plus the euro-connector, i think they are a little larger bore than the standard ‘pcl’ type?
Anyway, I have a number of guns, all gravity except one: A cheap machinemart 1.8 for primers/fillers. Another machinemart touch-up gravity gun, usefull for limited access jobs, getting in tight spots. Another touch-up no-brand gravity gun with a couple of small pots. My main topcoat gun is a devilbiss FLG-5, requires about 10cfm. Not overly expensive and highly rated. I think i also got it from SG’s direct. I have no complaints from it, the FLG works great with my compressor capability.
If you want to borrow the FLG to give it a try, just let me know.
Due to contamination, as mentioned above. I added small Sealey inline water-traps at the gun inlets. Compressor has always had a filter added. I’ll likely add another at the compressor before i repaint my car again. Since forever, doing small areas I never had any water issues. But then come the main panels opening up the gun to get a nice large fan and volume. I suddenly experieced those water droplets, hence adding the filters at the gun. They certainly reduced it significantly, but not completely. Moisture gathers at the tip of the gun during sparying until it gets blown off or drops off.
A complete pain in the tits. Only way to deal with it is let the panel dry, flat it off and respary it. potentially getting more water contamination. The odd discrete one i took a tiny paint brush and dabbed a drop of paint on. Once flatted it blended invisible.
I considered fabbing up some kind of diy air-dryer/dehumidifer intake for the compressor or just dry/dehudify the air in the workshop as much as possible? I don’t know. So easiest, i’m thinking just filter the shit out of it, but that will impact air-flow i guess, hopefully not enough?
perfecto, thanks paul.
i don’t think i’d have figured it fixed to that M5 on the rear, maybe?yeah, the spring looks wrong, it appears to be pointing inwards and needs to be outwards from my recollection to reach the retainer-bit on the underside of the relector.
Oh, i’ll have to get your spacer tool back in the post to you this week as i leave for work saturday. Based on the post code + number on the wrapping it’s K.E. Rd, yeah?
probably too late now, i see your car is an efi: fuel pump, injector or two + seals, pressure regulator.
Anyway, hope you have a trouble free fantastic trip.Great, very clear in what to listen for and what you are listening too.
I’ll give that a go.After cleaning and treating with hydrate-80. I sprayed my door hinges lechler epoxy then topcoat. i left the bolts and spacers. i cleaned/sanded the spacers then a light coat of h-80 again. Pan, like you to touch up on the car once final positioning complete.
my understanding with matt/satin, is that it’s normal gloss paint as such with a ‘matting’ agent added. The amount dictates whether it goes full matt or satin?
I was also told it’s affect on the paint, in the tin is temporary. so if paint is old, potentially the matting affect may not be as strong or be affective? I recall this was with a tin mixed for me, so gloss paint with agent added? This doesn’t make sense, as what with all those tins of matt/satin sitting on shelves for however long before being sold?
To corroborate, I haven’t found this on a pre-mixed tin i have of generic black satin 2k i’ve had for years and years. It still applies satin, as of last week anyway.
Also told by the supplier of the satin green paint i bought for the arms recently. Not to apply it too ‘wet’ otherwise it’ll end up gloss as normal?
i’m unsure if a matt/satin paint is less protective than a gloss? I just concluded it is the same. given it’s the same binder, no? Anyway, nowadays with epoxy primers and modern protective coatings i don’t see it as critical, that epoxy should stop anything getting to the base metal the way i see it?
So, yeah, bit of a lucky dip i guess.
I don’t/won’t overthink it. The ‘black’ bit’s around the car will be whatever black i have and comes out however it comes out. It’ll be black enough and shiny enough for what i’m hoping for.
Thanks for the input.
I’ll leave it for now and put my efforts in elsewhere.He has quite a bit of DS stuff for sale, likely known to the club & memeber?
No, you replaced your cups.
It was actually your blog replacing the gaitors that i studied and followed when i did mine.
You linked it on an ‘aussie’ thread on replacing gaitors i was reading.I think i might have mixed spheres, being split ones on the front. I also have a couple of split ones in the boxes of spares. Will be too old to use, but useful for exchange if i go that route.
Whats the deal with the ‘clicks’ of the pressure system when running. I recall if you time/count them, it gives an indication of health? I recal mine were maybe a little too often than ideal.
……. i even toyed with the idea of getting one of those companies to paint the car with a weather-beaten finish. I’ve seen cars with a dull, weathered finish that i think look really appealing – but that is every bit as labour-intensive and expensive to achieve as a ‘proper’ finish’ i suspect……..
Meaning to respond to this. I totally get this, wanting that look. Not the ‘rat look’ that takes it to an extreme with pseudo rust and worn through paint patches popular with the hot rod scene etc. Just paint that looks old, but still good.
i experimented with other projects. In short I feel it’s achievable with effectively a lazy polish job. My trials concluded with painting in satin-finish top-coat, minor flatting just to get any bits, significant imperfecitons. Then using a medium-cut compound, then wax it all by hand.
i ended up with a smooth, clean, but not overly shiny. With some areas, like edges, curves etc with a better shine, as they naturally do. To me overall it looked like old paint in good nick. With subsequent compounding and waxing it appeared to improve and add to the ‘look’.
These were smaller projects, so not so labour intensive as a whole car by hand. I intend to do this to my car, but with machine polisher this time, to take the labour out of it.
I have painted the black areas around the rear screen, rear panel and light-panel in satin black to give this the same treatment. I haven’t got round to processing it yet, when i have i’ll show results. Might be later in the year though?
Plus, if you ever want that super shiny look, you can simply polish it to that result with finish compounds and waxes.
Paul, 100%.
Its all sorted now. I’m sure that ball was always like, but it couldn’t have been.
Whilst reading the manual and looking at the corrector, it seemed odd it was out of the cradle and concluded that was my problem.It must have shfted out when the arms were out and the torsion bar could move side-to-side, taking the cradle with it.
I did slacken off the linkage, but scribed where it was before. I just positioned that ball back in the cradle, moved the torsion-linkages to where they where and its all good now. When i was moving the likages back, it depressurised the rear, which was a relief.
Tested, i’d say it’s as it was, does all it supposed to: up/down with the lever in cab and push down on the back, it raises and returns when released etc.
At some point i’ll go through and adjust it all properly for clearances and heights etc. But for now its acceptable.
moved on to cleaning and reassembling the bumper and fitting the flaps to rear panel + closing panels.
i concluded the fitting would be the thick-walled section seals around the normal return pipe, the collar on the end is pushed through beyond the thick-wall and prevents possibilitiy to be pulled out, easily anyway.
I took it that the more area sealed around the pipe is better. Hence the more thick-wall there is the better, i.e. whole section rather than ~10mm at the tip, yeah?
Also to to me it doesn’t make sense to have the return facing upwards? Pointing down would be better, collecting whatever might come out. It’d have to be full before anyhting was retruned and under pressure, unless there is a vacuum on the return, but that would collapse teh gaitor?
i’ll have to check again what i’ve done on mine. but i think i inserted the tube until the collar passed through the thick-wall, then pulled it back until it butted up against it inside.
Does anyhting ever get returned? my pipes look like they’ve never had anything in them. No evidence of fluid? The cylinder that did leak out, just dumped it on the ground with a failed gaitor?
OK, they look to be repros then?
Mmm, i think i need to insert my return tube a little deeper. That wider-collar is sitting within the thick-wall on the end. i thought it should be like to have a tight seal around it. Good to know.
That return tube, i take it that is there if some major leak develops, so not to loose fluid? Under normal conditions of course there shouldn’t be any fluid passing the cylinder.
no, i haven’t made those tools, have to look into it.
my car is efi semi-auto, will that make any differences regarding rear brakes?maybe it was the fronts i bled. I recall loosening a nipple on some control-valve-block affair within the engine bay. It was straight froward. i did it as a matter of course, not that i had any issues with the brakes when it was on the road.
thats a good tip about the long hose, but i’ll have to get some, as it will be a long hose?
can you elaborate on why weight is needed on the rear, is it to activate the suspension? I’m thinking without wheels the arms will drop as if in the heighest position, so no pressure sent to the rear? Is this correct? Does that matter for brakes?
when you say wheels off, like removed with say stands under the arm where the stub-axle passes through? I’m concerned about the car lifting and coming off whatever is supporting it, if angles change and the stands tip??
Can’t i just start the car, press the mushroom to send pressure to the brakes, bleed it that way?
So it’s all back together now. Assembled the larger arm-bearing, seal + housing, straight forward enough. I reused my old lip seals as they were very good. Plus the pipe-tool for the smaller wheel bearing is suitable for the smaller bearing on the arm.
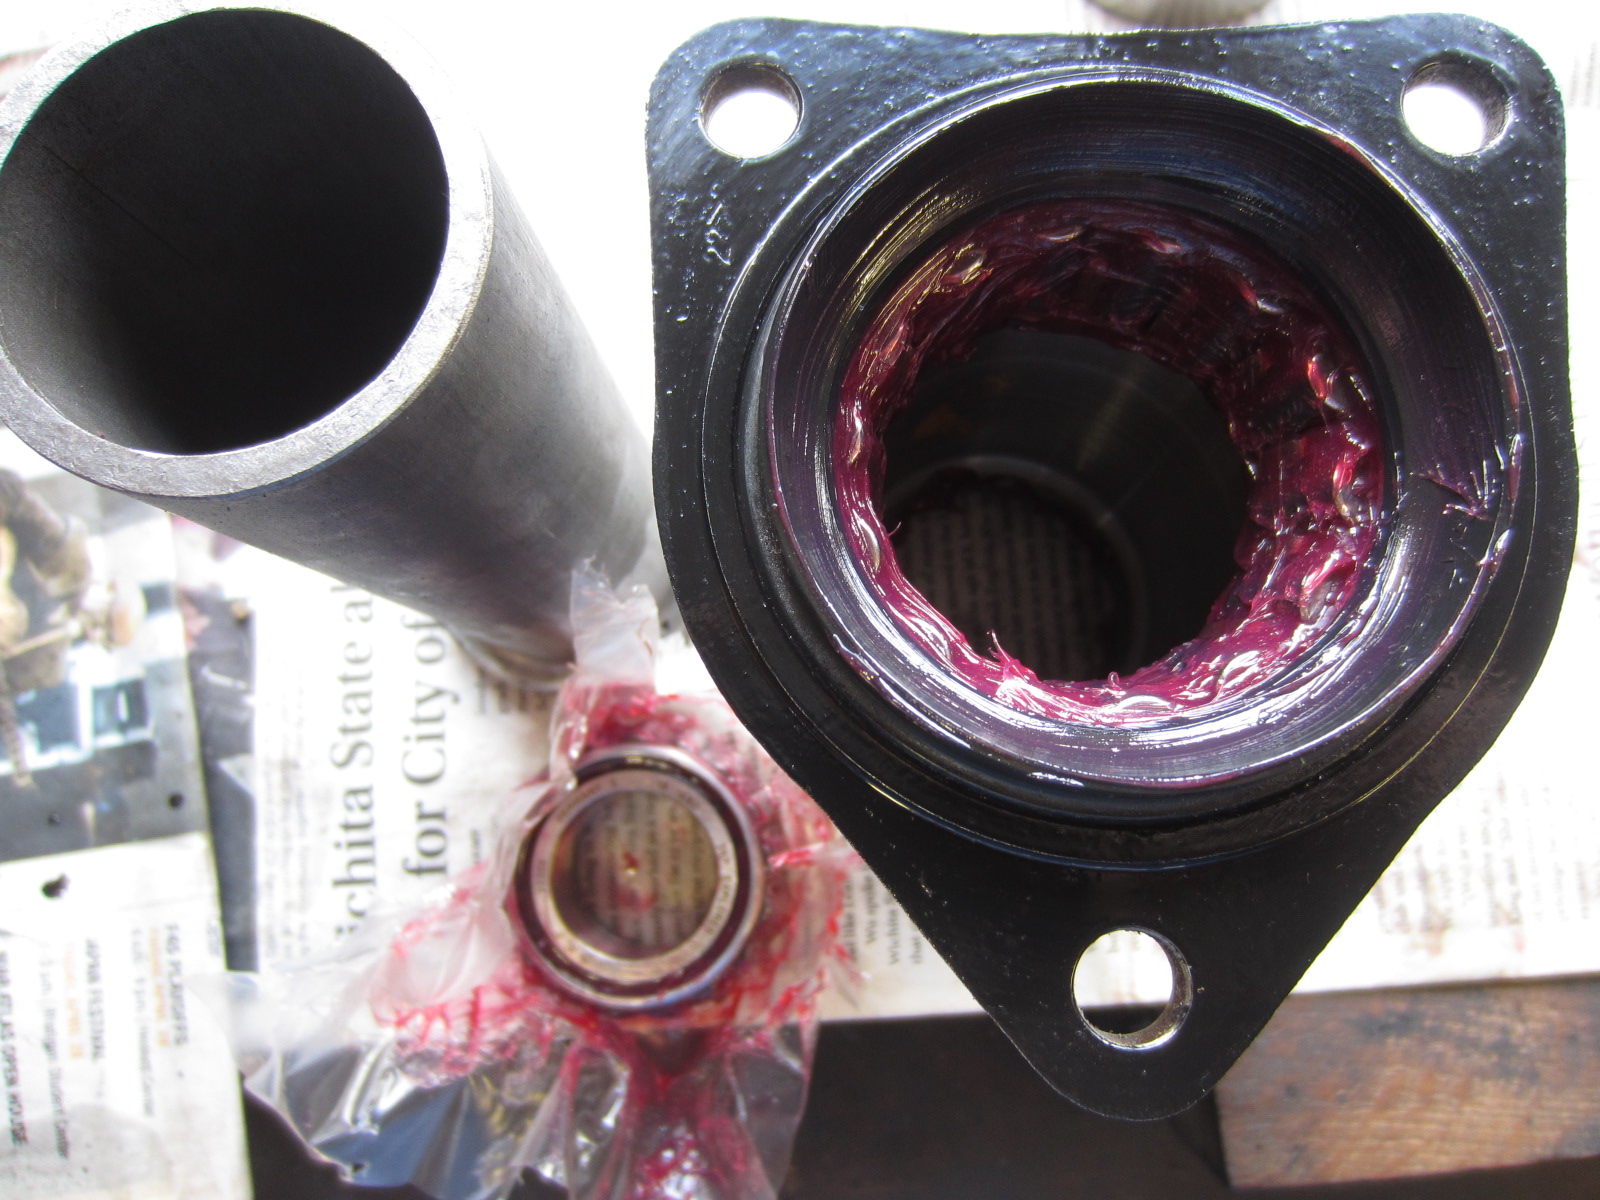
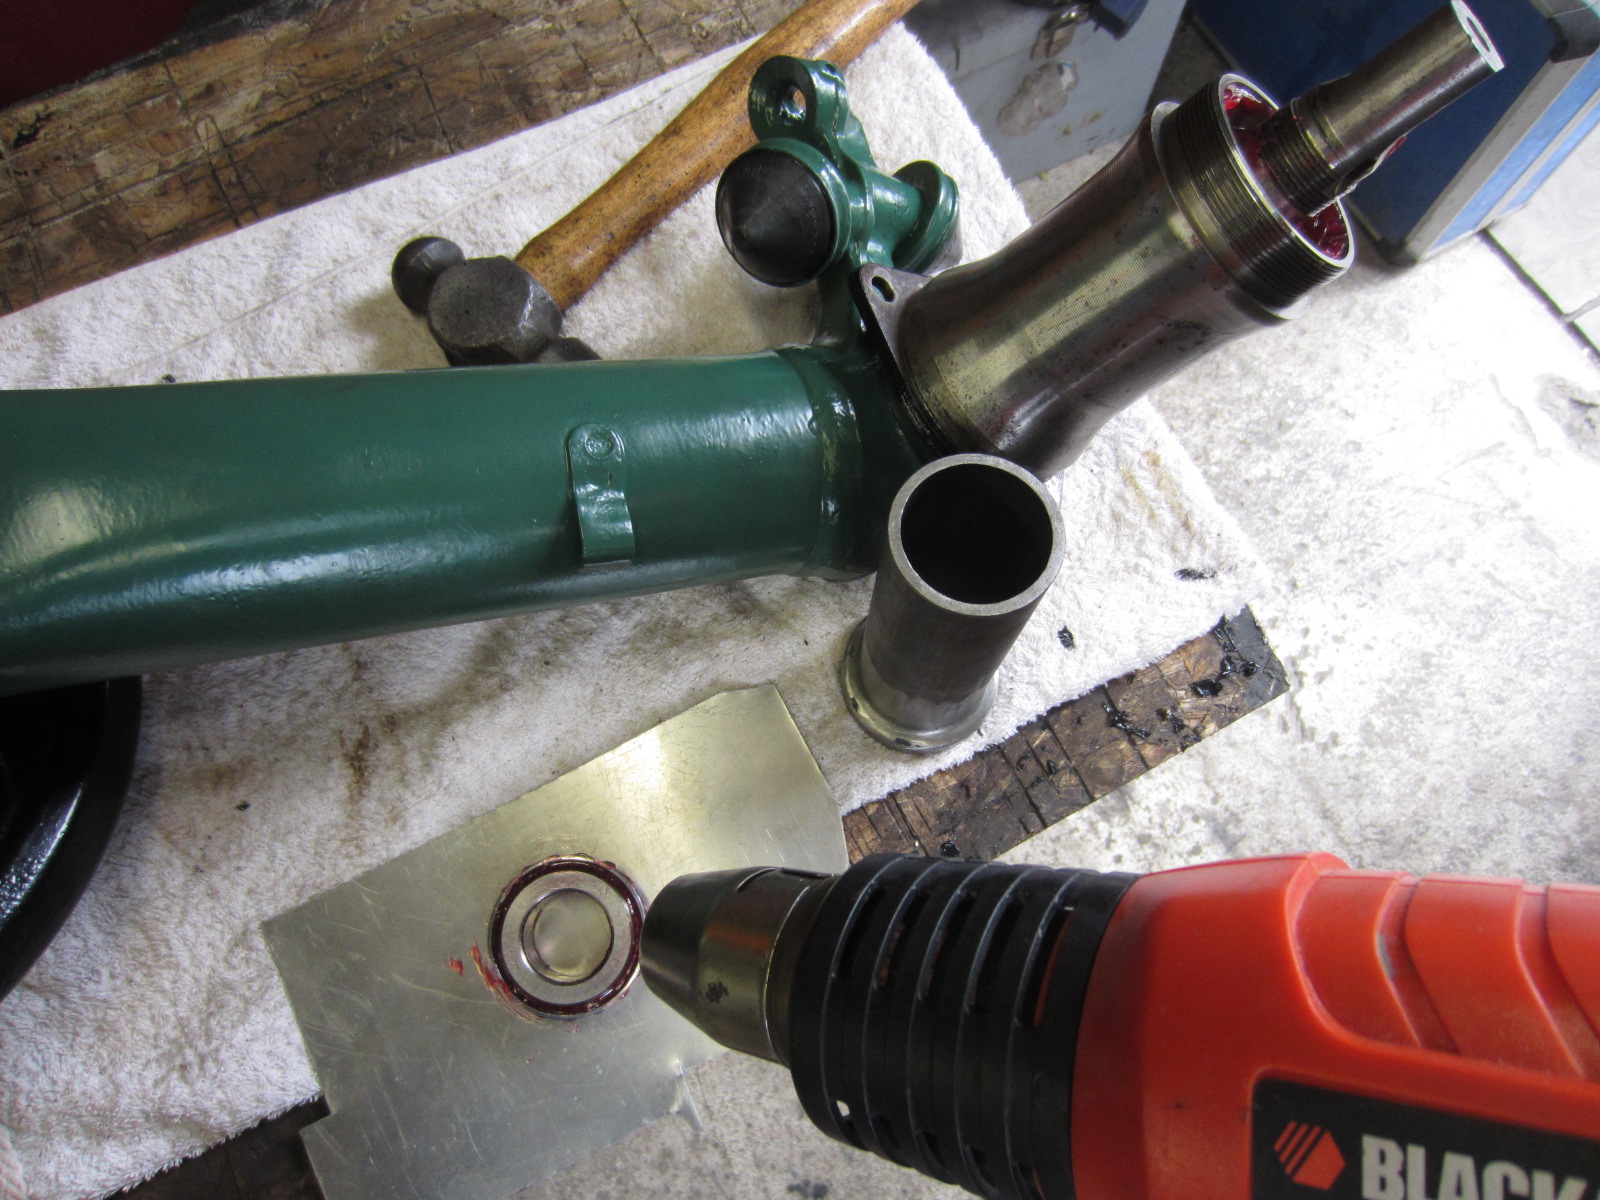
For the small bearing i prepped it, and heated it up the inner race, it dropped over the arm-axle and seated, no force required. Perfect. I gave it a tap to make sure it’s seated and left it to cool.
tightened up the nut to 85Nm, then backed it off 1-flat, then peened inwards the nut to lock it in place. packed it with more grease and tapped in new covers with some other tubing i had lying about. Thats it the two arms complete and nearly ready to install.
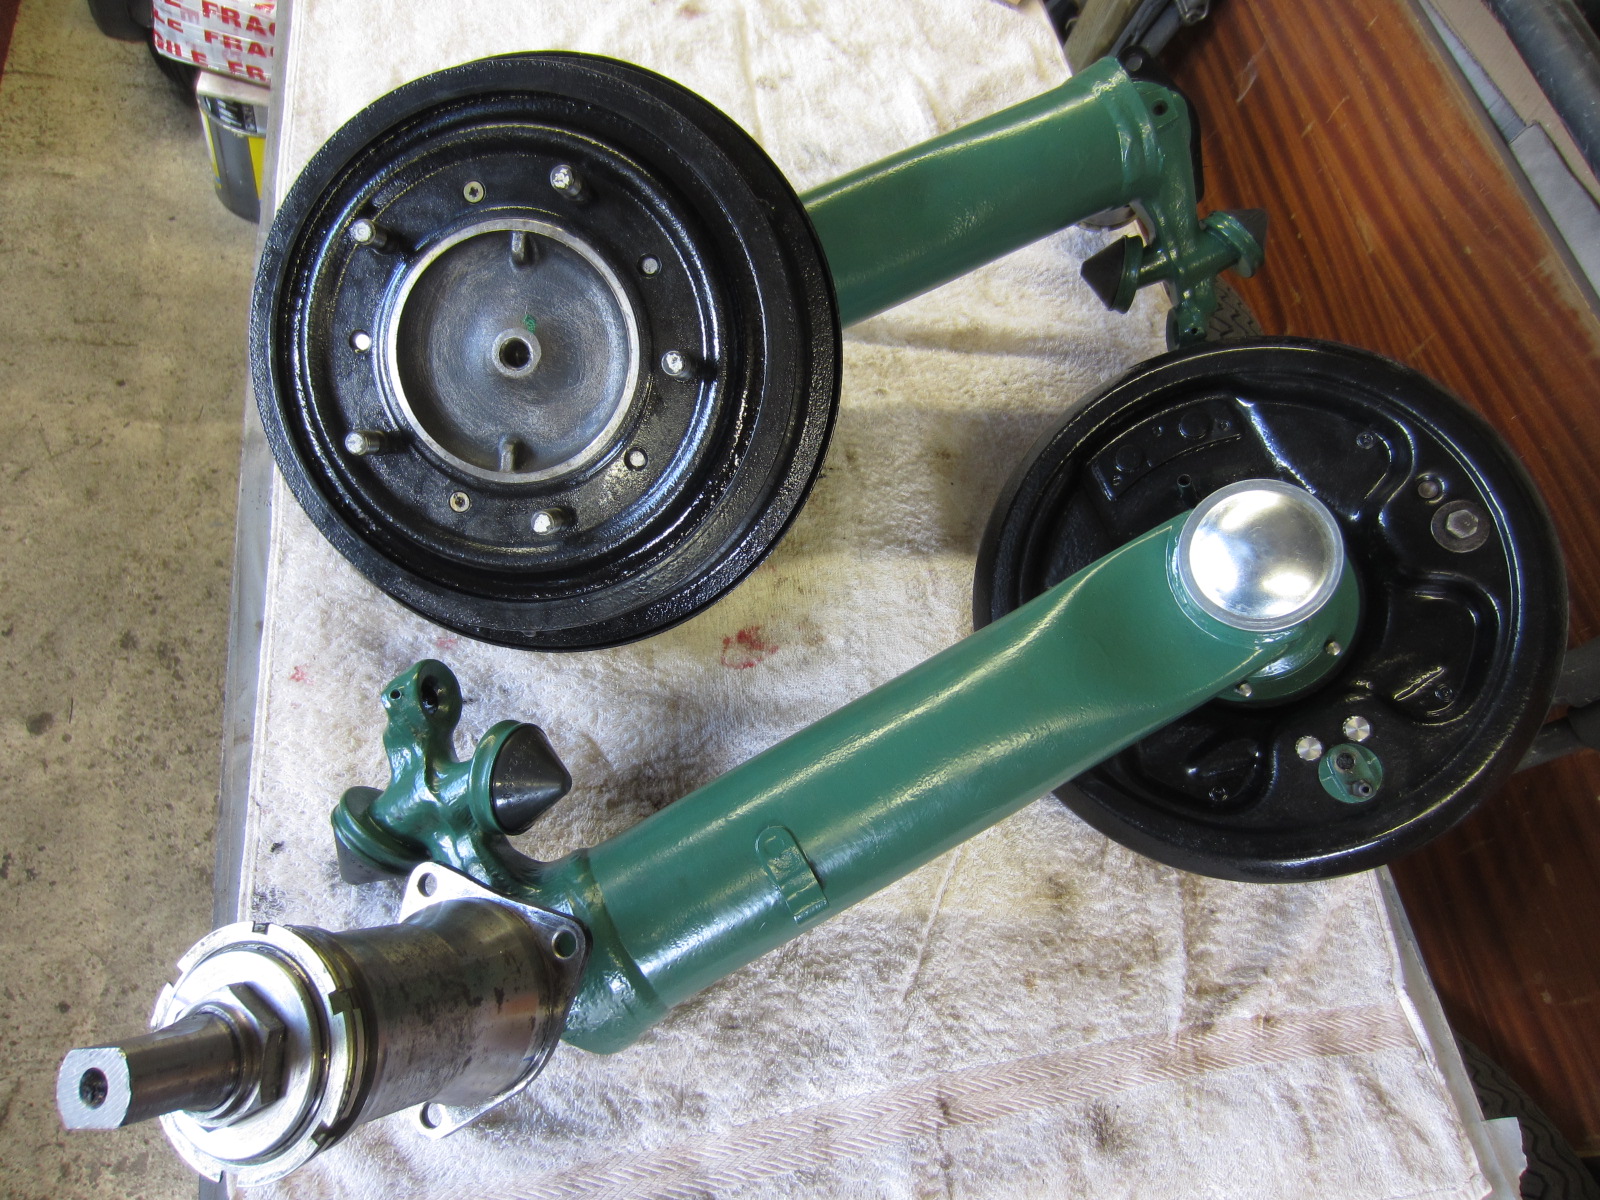
I went on to the suspension cylinders, replacing the seals. I saw a trick on a video to use the thick washer to push the white plastic seal down bewteen the ram & oring. I also installed the ‘reconditioned’ ram i got with cylinder for sassens into my cylinder replacing the corroded ram.
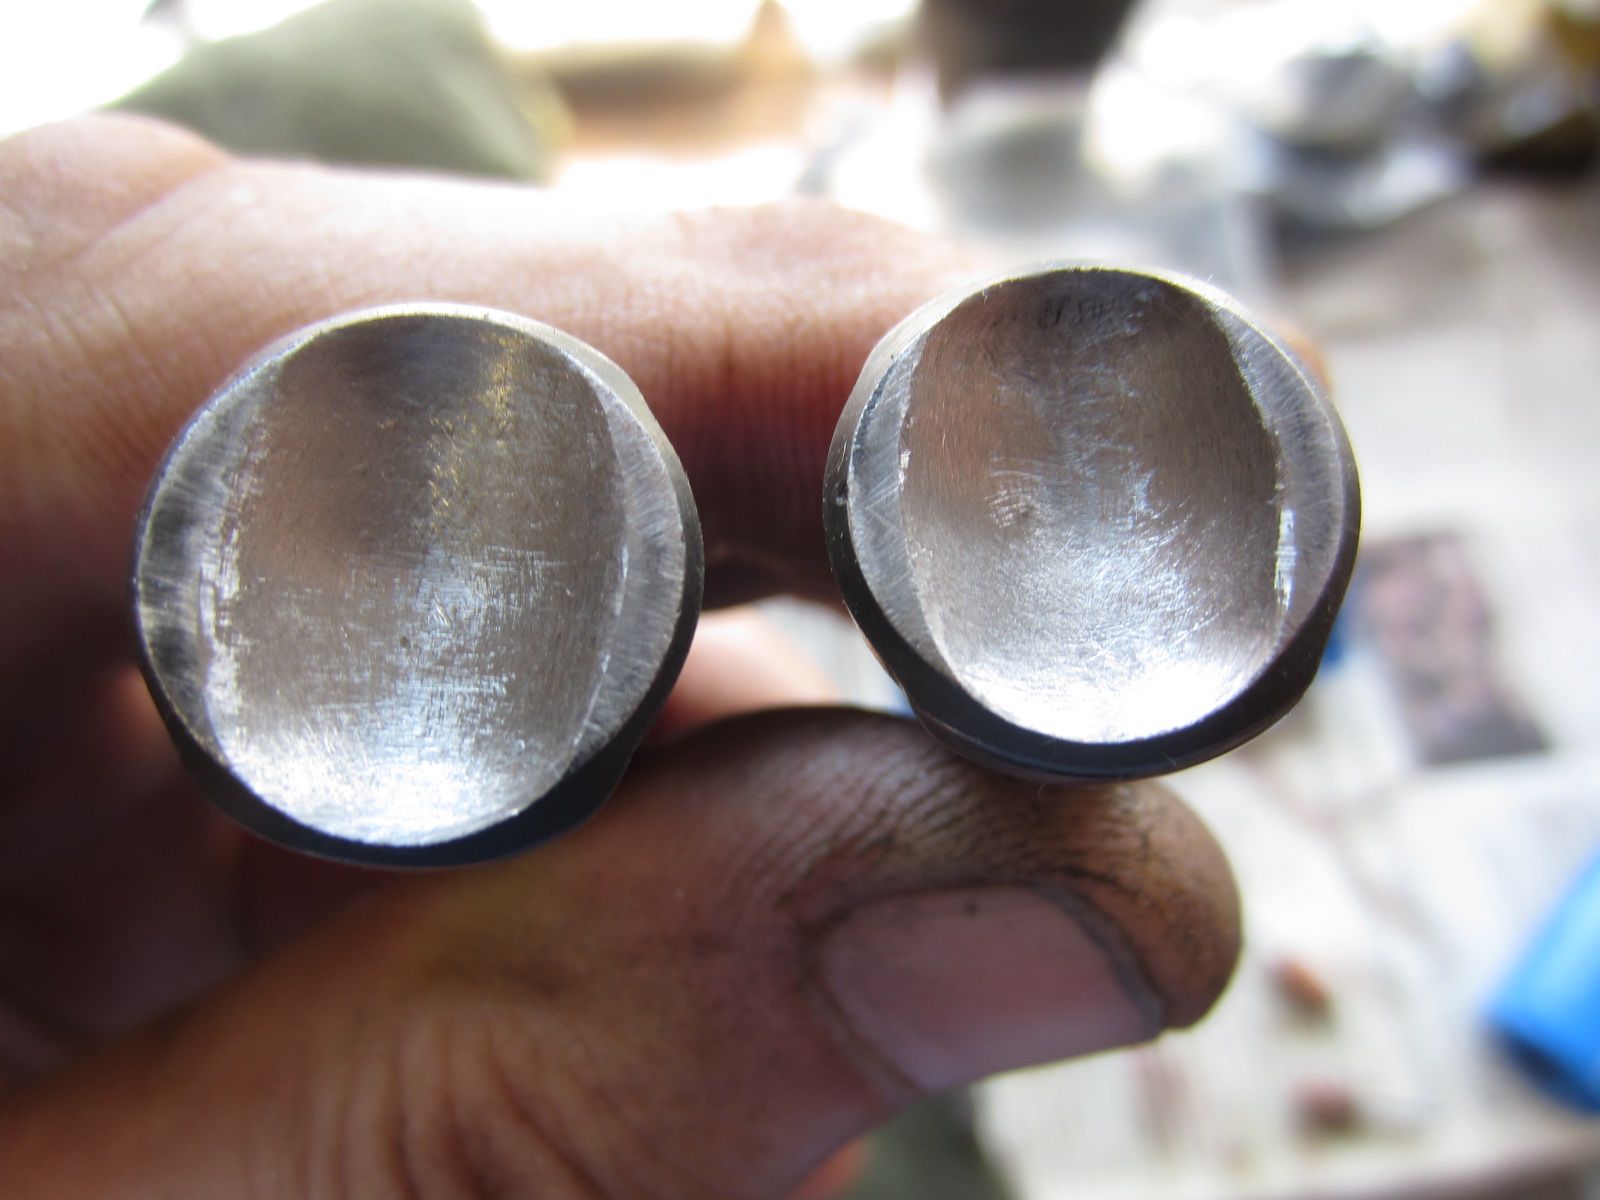
my push-rods were typically worn. Funny at first i thought these were good. The shiny parts being the bearing-surface required.
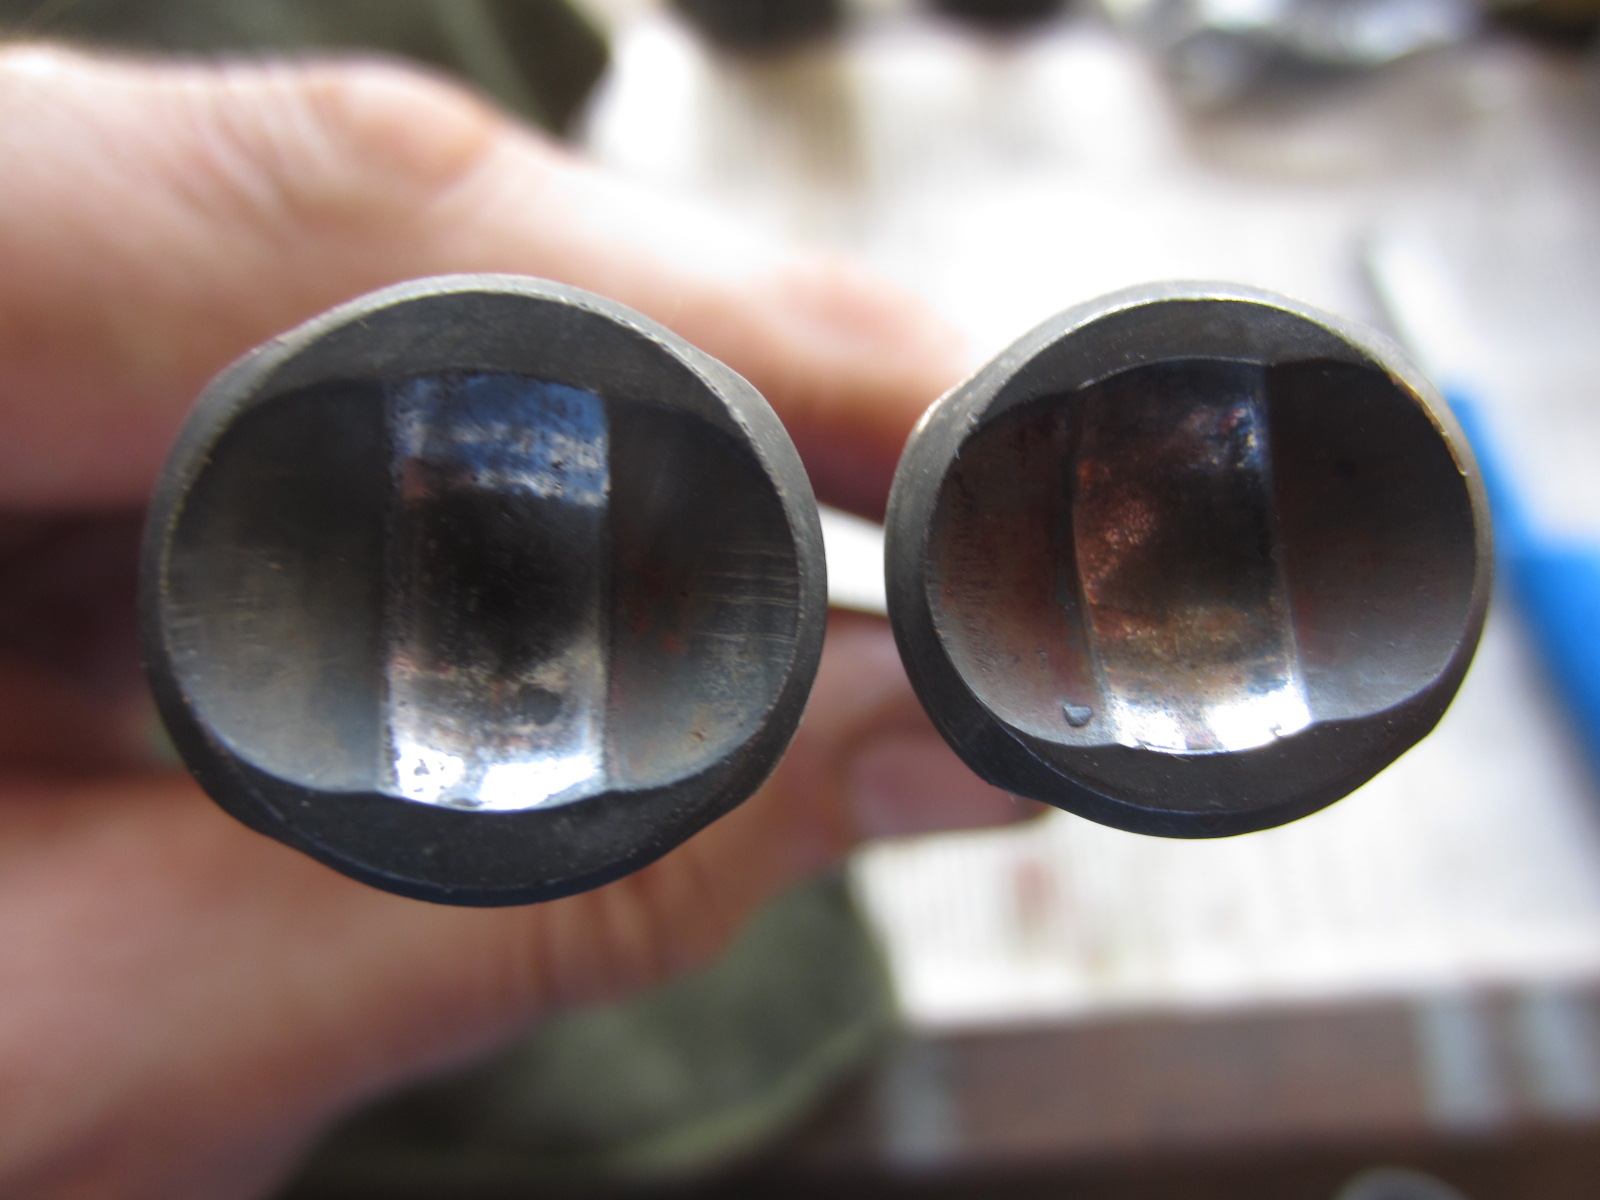
In reading, finding this is not the case. I dremelled them back to concave.
I also saw that the cups had burrs too.
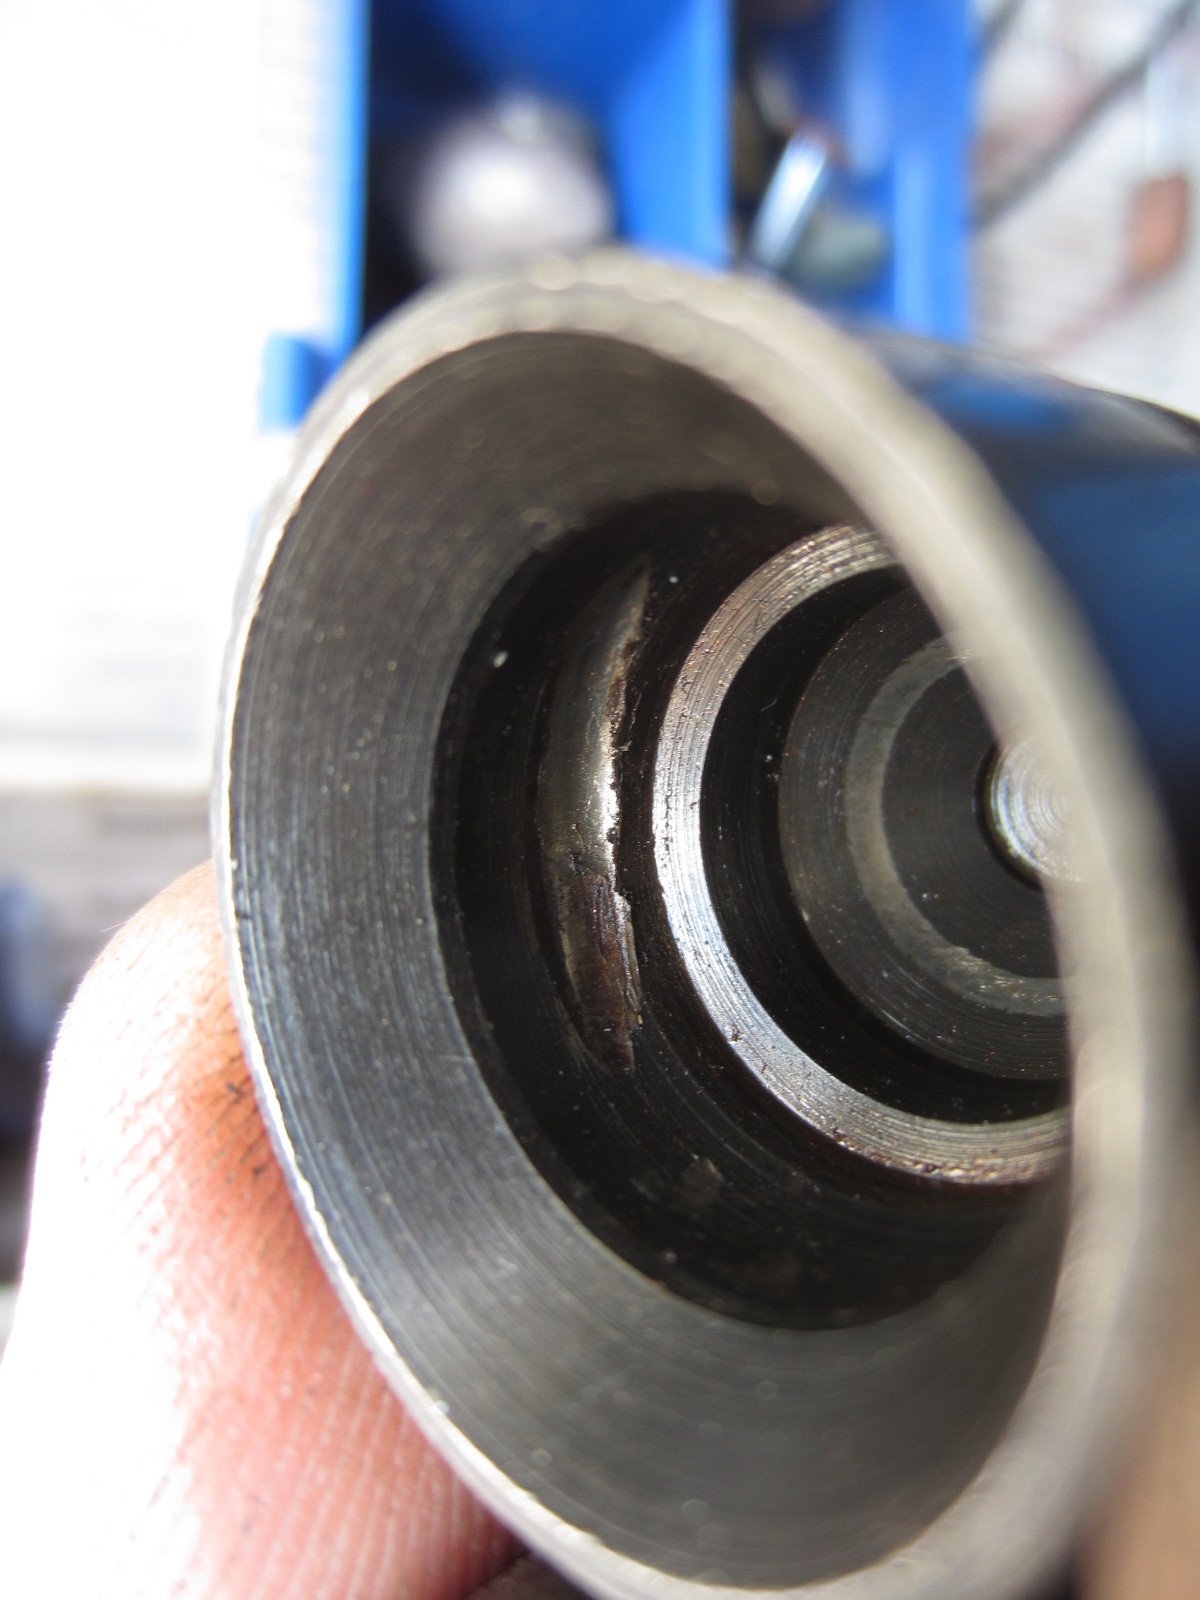
I gave them the same dremmel treatment to remove the burs. Unsure if they would be better replaced, but see how it goes, it can always be done at a later date. Don’t see what they shouldn’t be OK. Packed with grease, no edges to catch/click? They feel smooth when assembled with ball + rod.
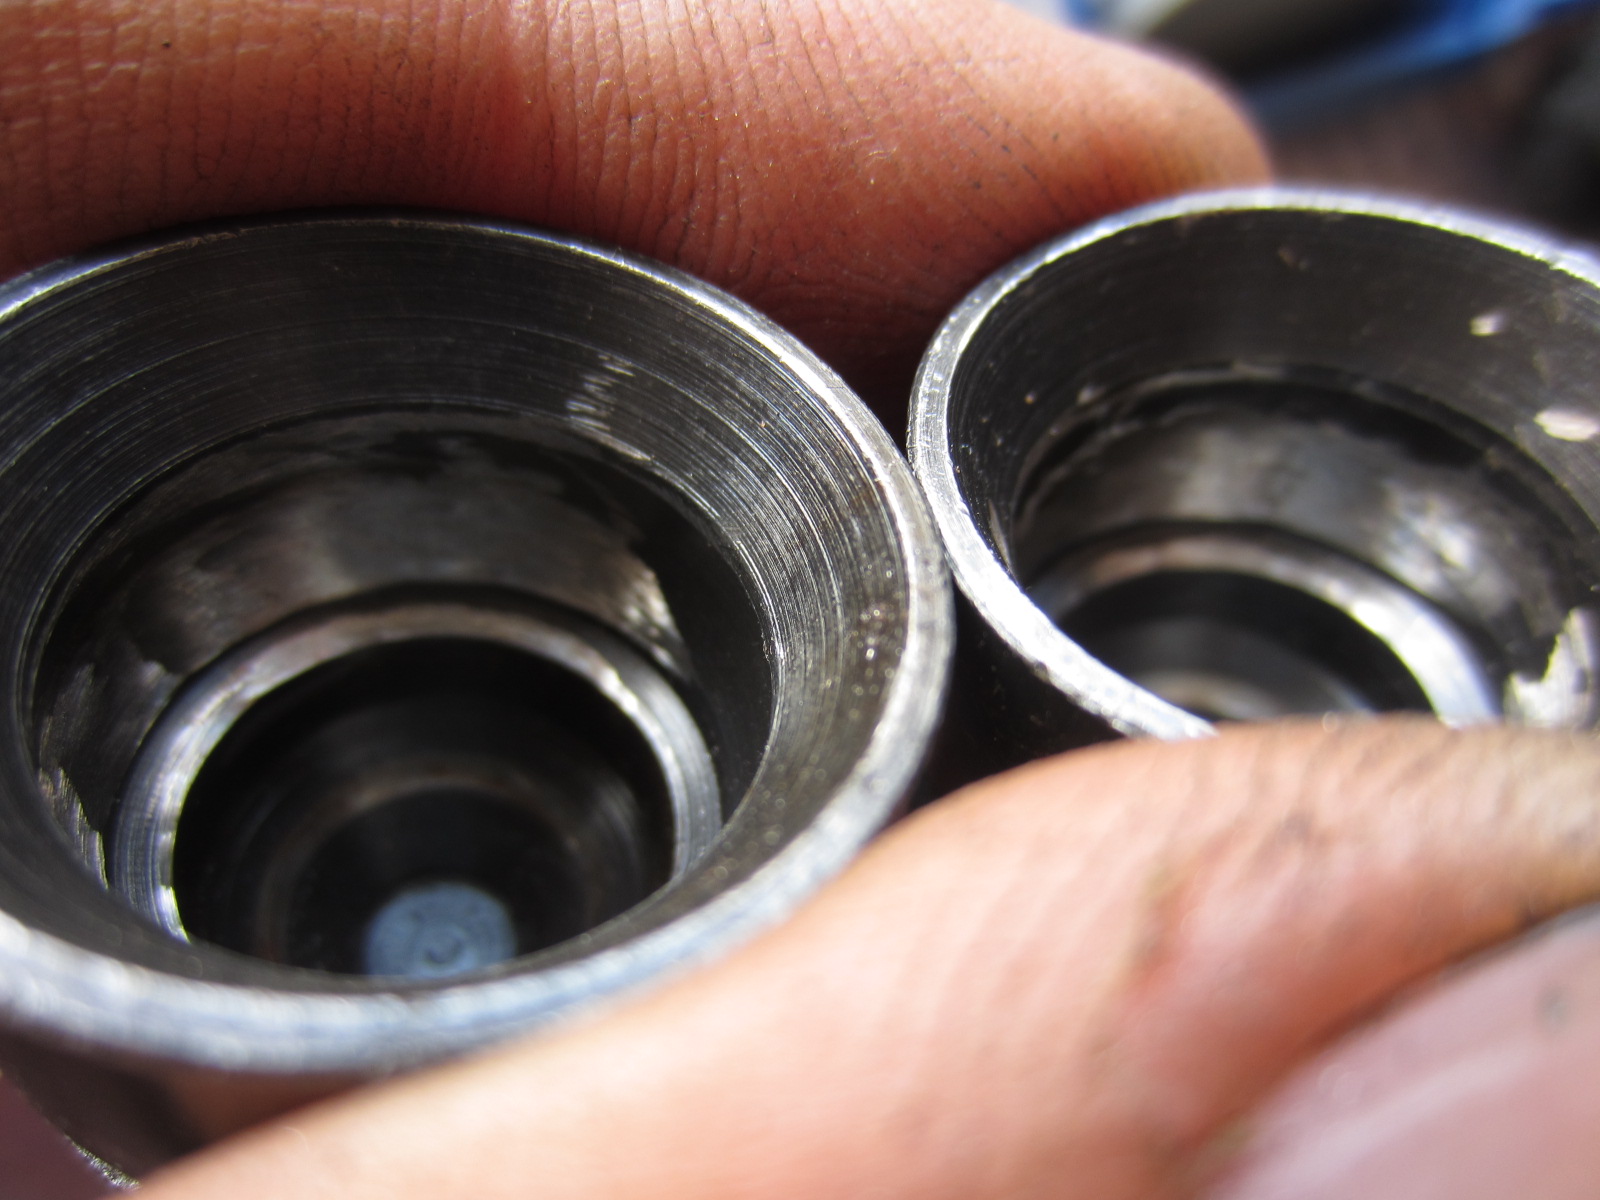
I went on to fit the gaitor to the rod. I have the ligurex tool, so made easy work of it. Some cloth-tape around the rod prior to strapping that and assembling the cup, bearing and cover on the other end.
I installed the cylinders. My original triangular-clips are good, but i hade some new repros too. One thing, for all my endeavours i could not get the cylinder ‘rigid’ in it’s mounting, as expected? There is a slight bit of rotational movement, but also some wobble to the whole affair? I could not get any diferrence betwene oem clip and repro clip?
I conclude that is the way it is and under pressure, it’s solid. Is this right to have some movement in the cylinder when fitted? I can’t see how with the tolerance in mounting and that little clip can hold it rigid? It was of course ridgid before and took some knocking out, but had half a centrury of crap holding it in place?
Installed the rod + gaitor to the cylinder, thinking it would be easier without the arm getting in the way, especially to ligurex it up.
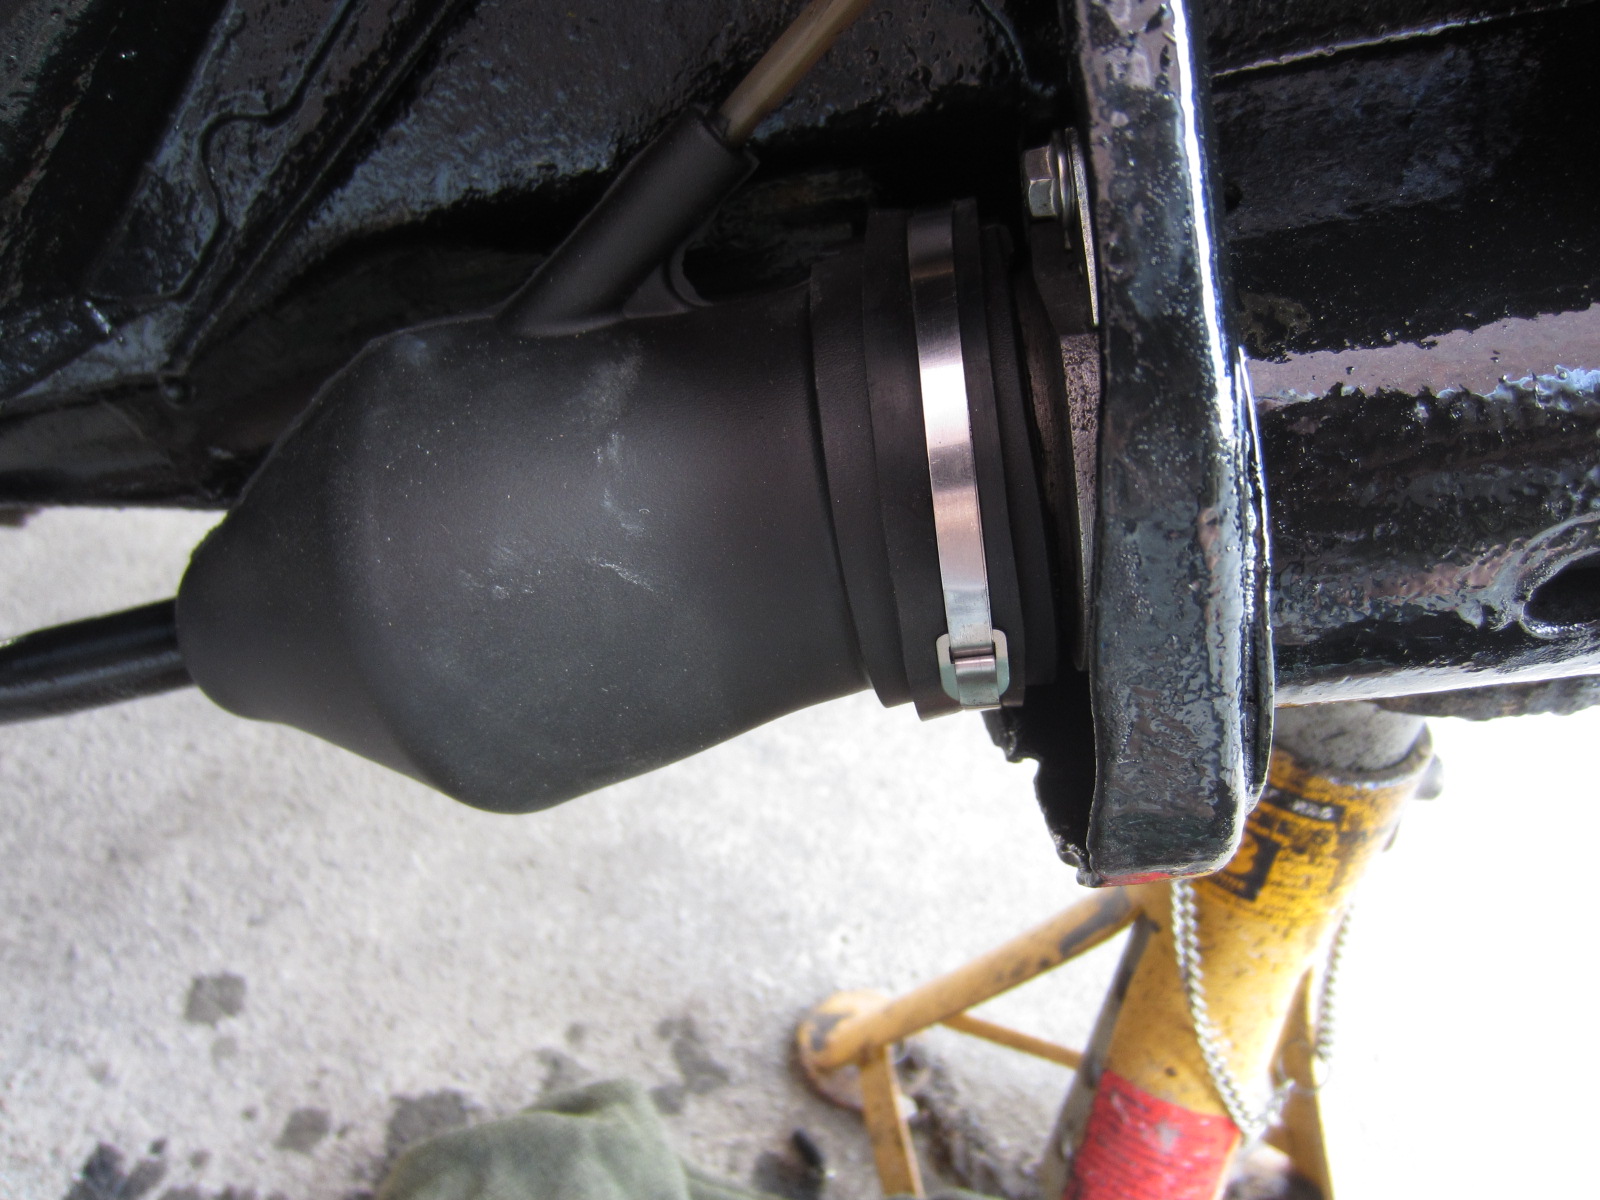
i went on to prep the arm by installing new brake lines and hoses. My old lines were good, but one of the hexes got a bit chewed on removal. My old hoses actually looked good, Lockheed items. but even if new before i got the car, they are now 20+ years old. Hopefully the replacements are descent quality? I’ve kept the old ones for emergency spares?
New seals have been fitted to everywhere a line was disconencted.
i prepped the lower-closing panel for under the height corrector, adding the seal. The closing panels have been epoxy primered and then POR15 top coat. I wanted them contrast to the undersealed inner arches.
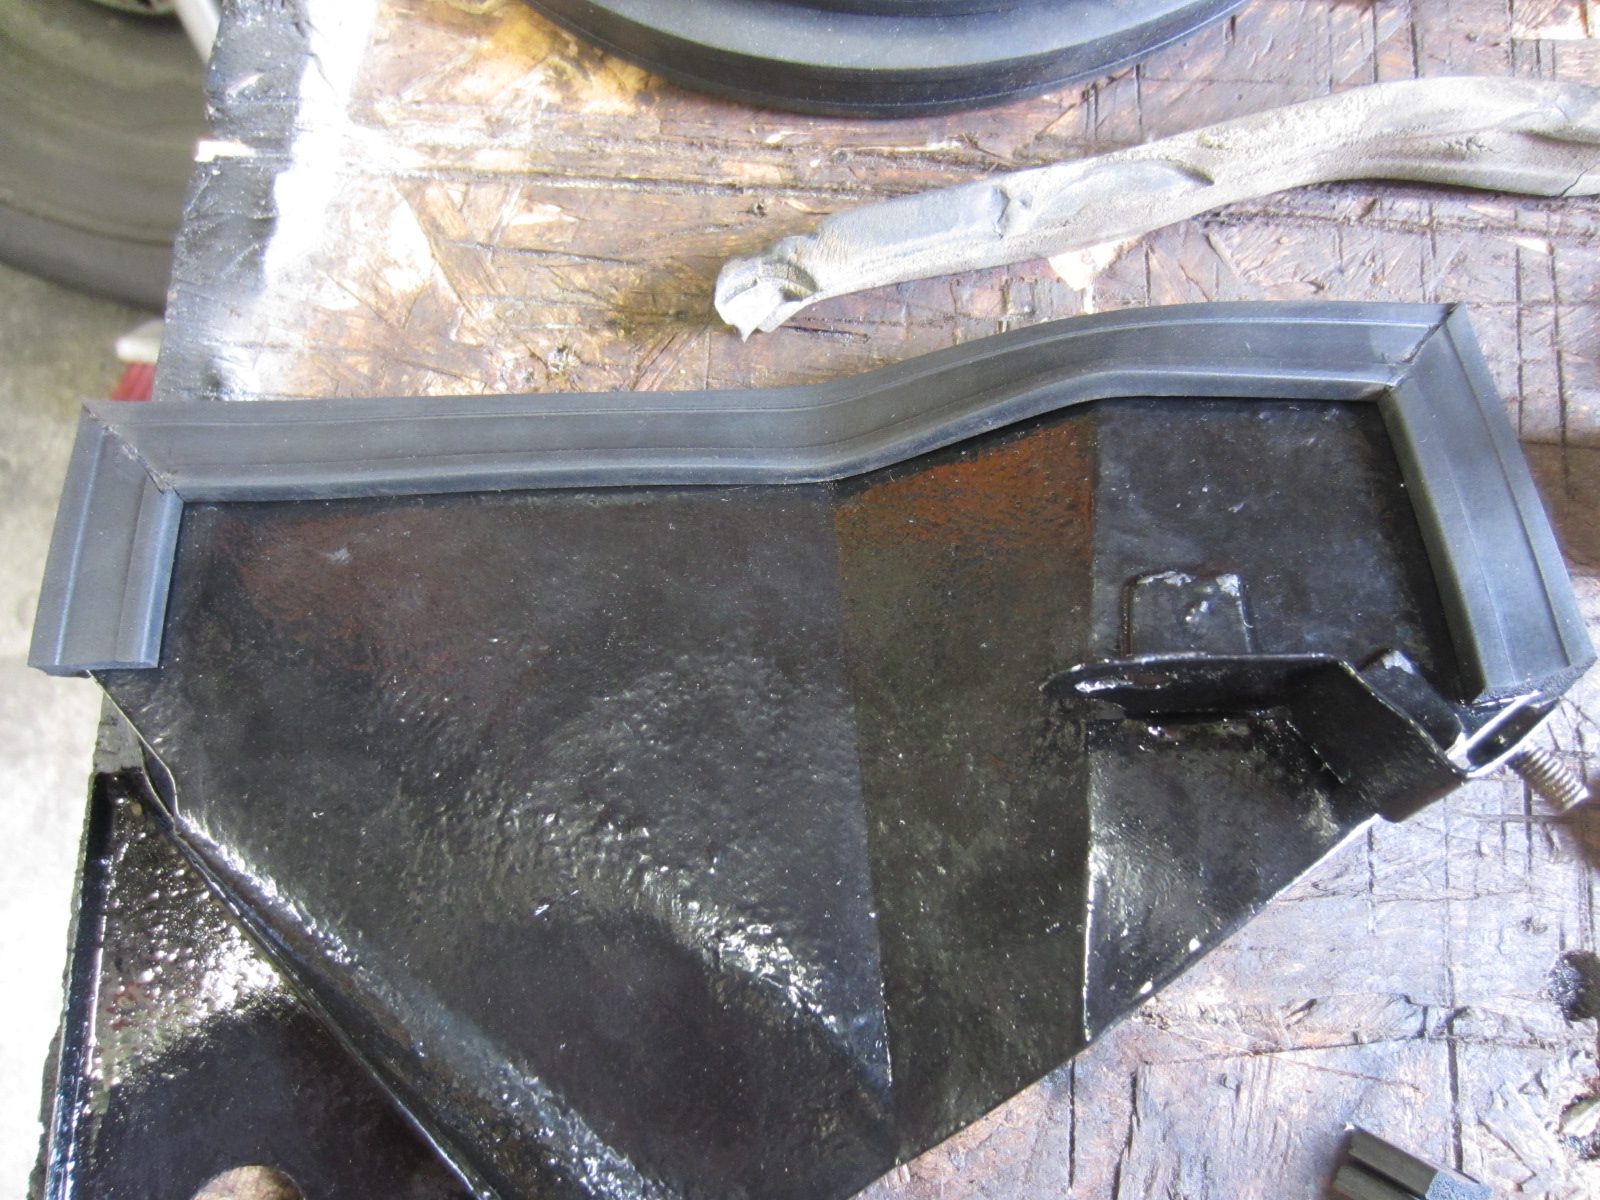
unfortunately i could not get the panel to fit with the small end piece of seal in place. So i had to remove it. It tucks right into the forward corner and isn’t really seen anyway, but dissapointing the same.
So with that i installed the arms. After getting the arm mounted on the studs, i used the nuts to draw it on fully. Then tightened the ring on the inside. Then removed the nuts, degreased the studs/nuts and refitted with a little loctite. I then removed the locking ring, degreased that lot and refitted with a little loctite. Usind a drift i hammered it round until tight.
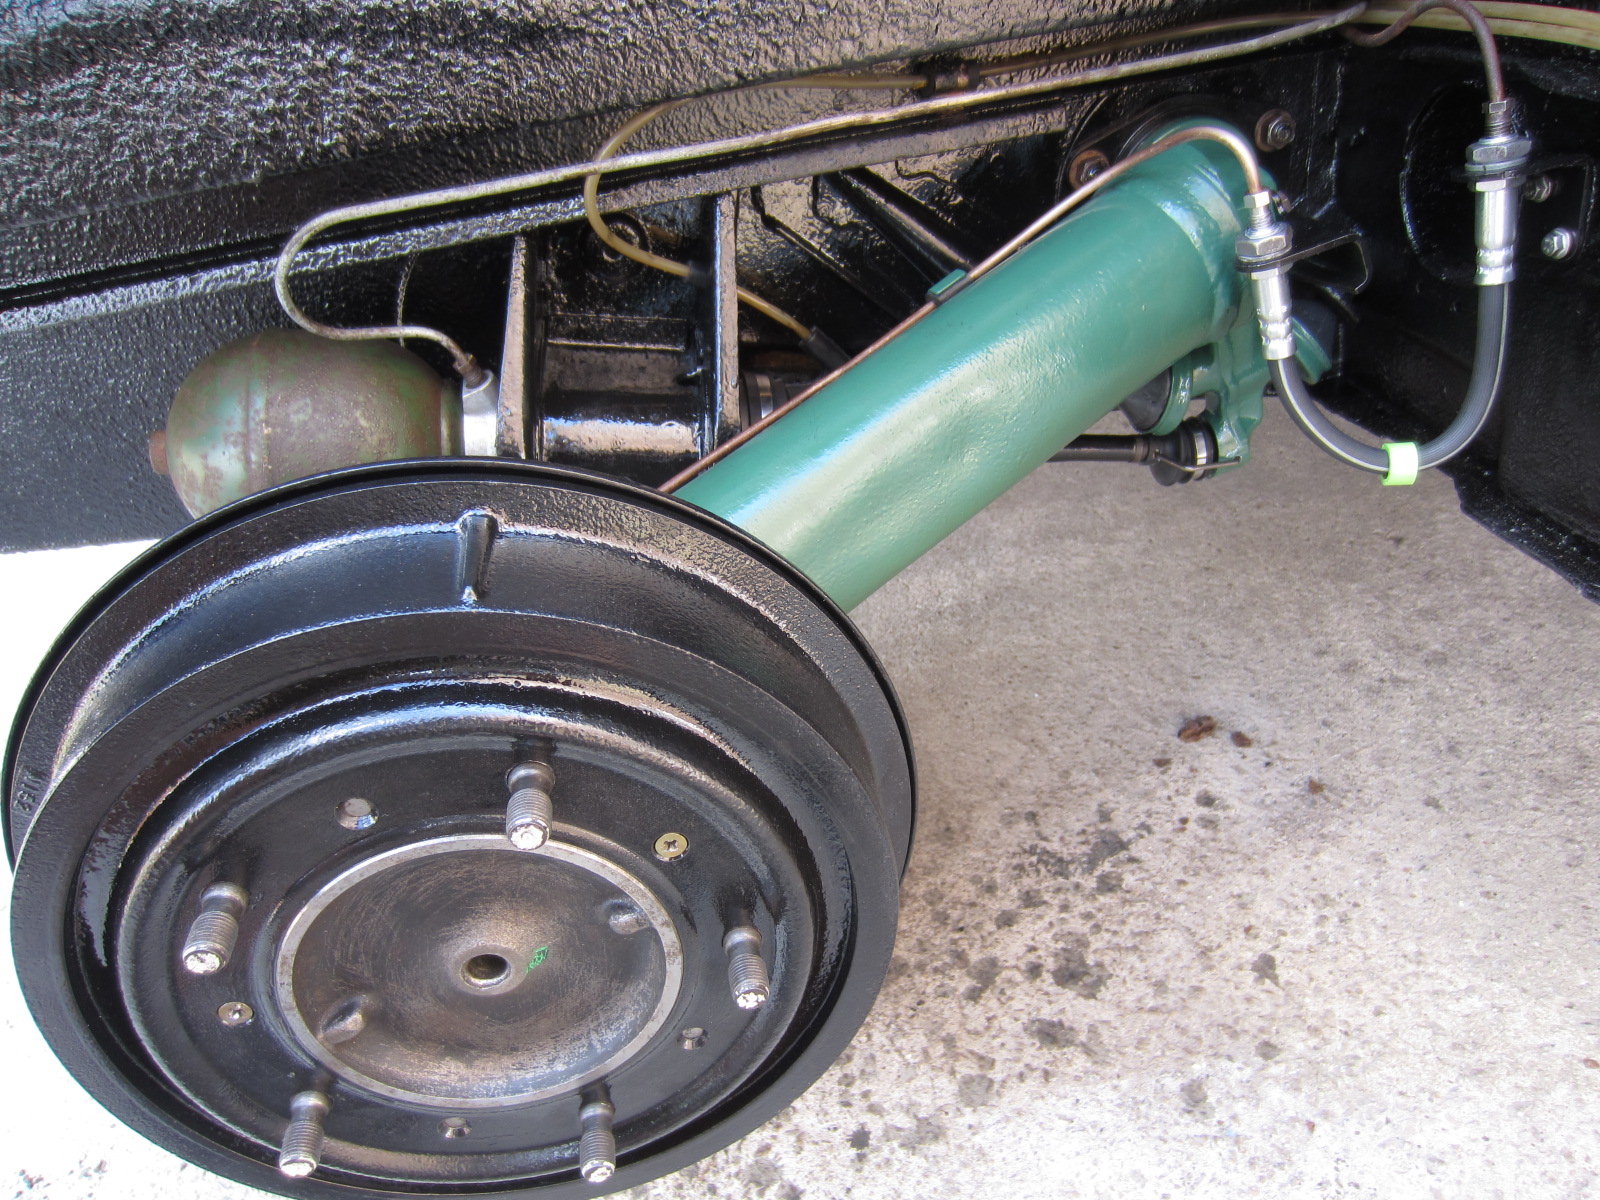
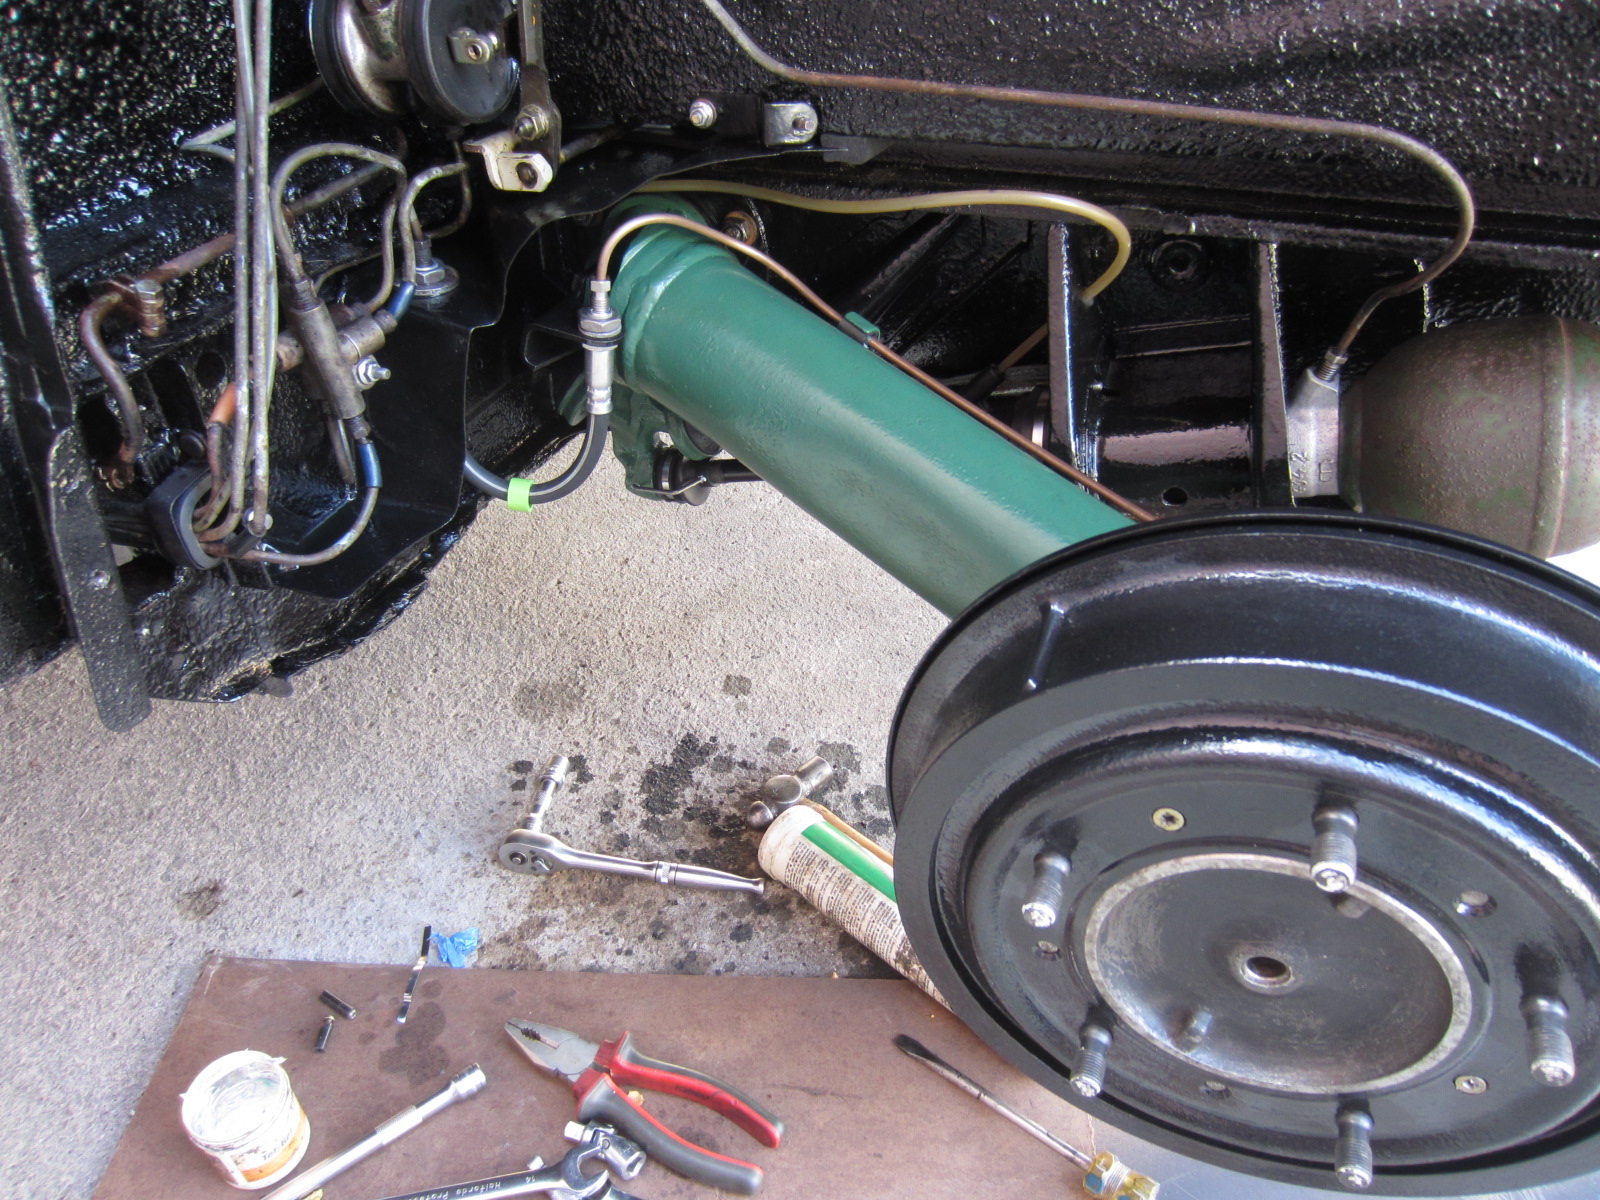
I’ve left the spheres as they are for now. Though they look to have been newish not long before i bought the car, being stamped up July 2005. I bought the car ~2007? They haven’t done much work, but are 20 years old now. I want to research spheres more. Should i go for split-ones, comfort ones. Can these be used in ‘exchange’ or are they effectively scrap?
So thats me regarding rear arms. Tomorrow i’ll top up the lhm and start the car, see what it does and check for leaks? Once all good, refit the larger closing panels. but I have new flaps to fit to those beforehand.
-
AuthorPosts