

Forum Replies Created
-
AuthorPosts
-
who, me?
I don’t think it’s the rubber gasket based on my tiny experience of them. It is the mounting studs on the back of the lamp-base. Rubbers look the same, mine had some minor indent from where the lens has been on for years likely. But to make them fit one-way only.
that peel isn’t a problem. you can always flat it a little. I take you’ll be putting primer-filler on top, flat that prior to paint anyway?
my preferred method is also epoxy primer the panel after any metal-works, then apply filler on top of the epoxy, then recover any works with epoxy again. Invariably you break through here and there during the sanding process. I would mix a bit of epoxy and brush it on. Save getting/cleaning all the spraying gear out. Finish isn’t important, but coverage is.
It takes no time to go off really, then apply more filler on top if required. It is somewhat time consuming, but you have any filler works always sandwiched as you say between layers of epoxy.
so fari, so goody.
with some sacrificial backings you could make the amber sections indicators as normal. fit dual-filament in the ends for tail/stop and make some red-lenses for the trumpets and tap those into stop lights. That could be a little different?
they do look very good in palladium. in particular with a black vinyl roof i.m.o. So period.
i preferred the palladium-A, a bit darker than the ‘B’.I could only get ‘B’ when i got my sample. I still have some left in the tin, if you want it for a spray-sample?
Not much, probably 100ml+? might get a bootlid if you stretch it out. or say half’n’half nocture/palladium?i saw two things, first some lamps were real close to the top-rail, almost looked to be touching, like one of mine? Secondly, those wonky lamps looked like the same initial problem i had. The alignment of the mounting-holes aren’t very good.
if you look at the bottom rh image of mathieu’s post. the lamp is bolted in. Look at the gap in the outer-end, lhs. Massive. Those ‘U’ shaped mounts needs drilling off, refabricating or re-bending, so the hole is in the correct position to centre the lamp.
There is a little play in the studs + holes, but not that much. Aligned correctly they should fit/sit pretty much bob-on. Possibly some of the worst ones have the wrong lamp-side fitted? The studs are not inline, centred to the lamp. One is higher/lower than the other. So in the wrong side, i.e. OS in NS & vice-versa. They fit really bad? Lens itself is universal for OS & NS, just fitted upside down for one side.
Paul, all the photos are good.
I downloaded the rally ones too. I concluded from those photos most folks lamps are even more crooked than mine :). Plus they all seem to be biased to the top bumper-rail too.I think i will tweak mine to get a more ‘balanced’ install, centralizing the number-plate recess between the bumper-rails. The lights will end up where they end up. but at least horizontal and in line.
never seen those before. They look quite nice with the amber centres.
i suppose te brake lights are incorporated in the ends? could fit those, stop/tail on the ends and make some red lenses for the trumpets, unless they are already available (USA?) for additional brake lights?it is reproduction, i’m sure of it, unused. i did have to rework it quite a bit. more info on it in my odds/ends thread. i’m confused with the coffin lights? I think mine are coffin’y shaped? i’m only aware of the round lights with early british cars is it? And the rectangular ‘coffin’ ones as you describe. The actal light-fitting is made of plastic not metal. I’m sure the panel is for the car, it was effectively the same, identical to the one that came off. just badly made.
Have a good day paul, however long. It’s gonna be a scorcher.
if you can manage a photo or two of a rear light w.r.t. bumper rail(s) would be good?
Your spacer-tool was posted yesterday morning, royal mail signed, tracked etc. It might even arrive today?i’ll need to give that lot some attention when i’m back. I misread the info in the 814 manual when i glanced it over. Because it just says gap is parallel ± 2mm or so, i thought that was the gap required! my gaps are much larger! But i can see, interpret the gaps aimed for are a little more realistic.
i fettled my rear wings, moving them outward a little at the rear-panel brackets to give a larger gap at the bootlid ends. much better now, but they want aligning better up/down too. I’ve left that for now.
When i replaced the rear light panel, i found it had poor alignment for the lights. I had, albeit small, but clearly evident gaps around the rubber seal on the small end of the light fitting. Not the case with the original panel i was replacing.
I made sure the lights were the correct side, as i got confused what was NS and OS. But they seem irreversible, as fitted to the opposite side the fitting was clearly wrong. I concluded i had them the correct orientation. I marked them up os/ns for easy reference.
i then reworked the mountings to place the fixtures ‘centred’ around the opening, so there is no gaps and the seal is pretty much equally distributed around that opening. I had to completely detach the mounting bracket and rework to give correct fitting.
I took measurements from my original panel regarding the mounting of this panel, to check that stayed pretty much the same, within a few mill anyway. it all seemed OK. I was happy with the result.
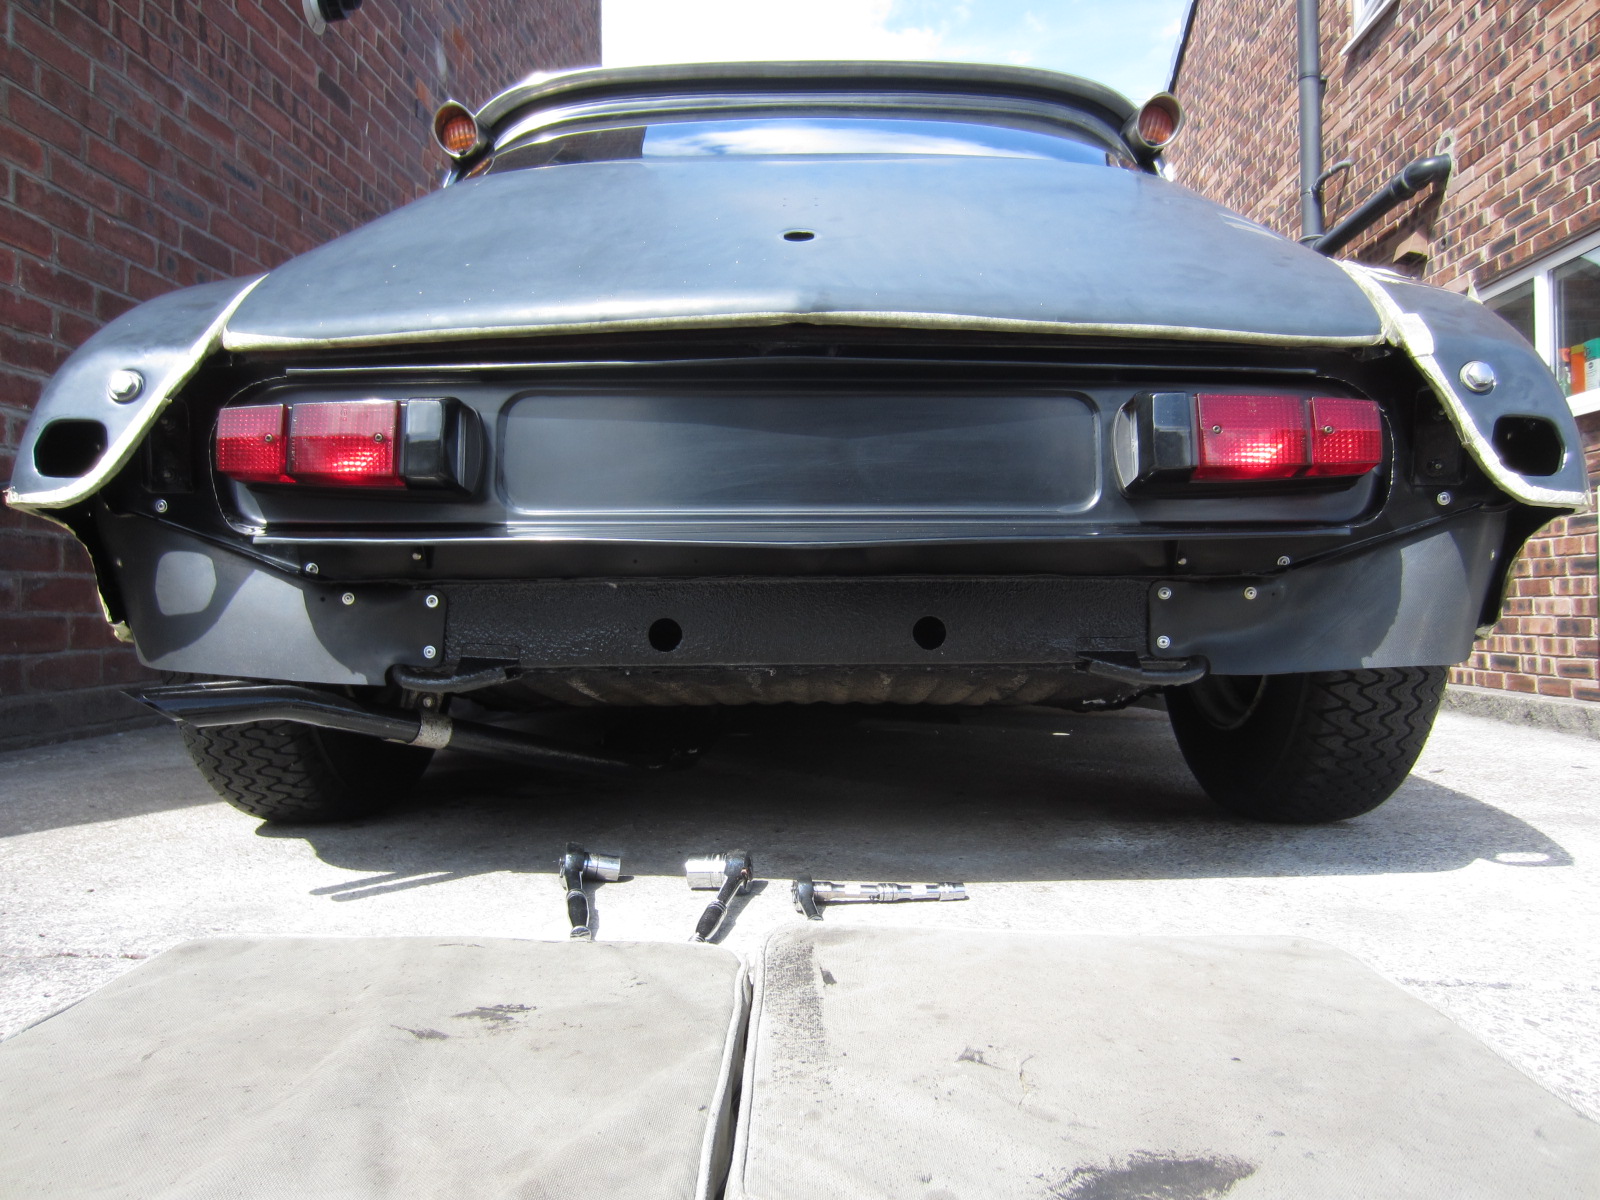
But when the panel was fitted, it was a little wonky, higher on the OS than NS and noticeable by the eye. I fettled it to level it. But when the bumper was fitted the lamps seem a little too close to the top cross-bar and looking at how the number-plate area sits, the whole panel could do with coming down 5-10mm.
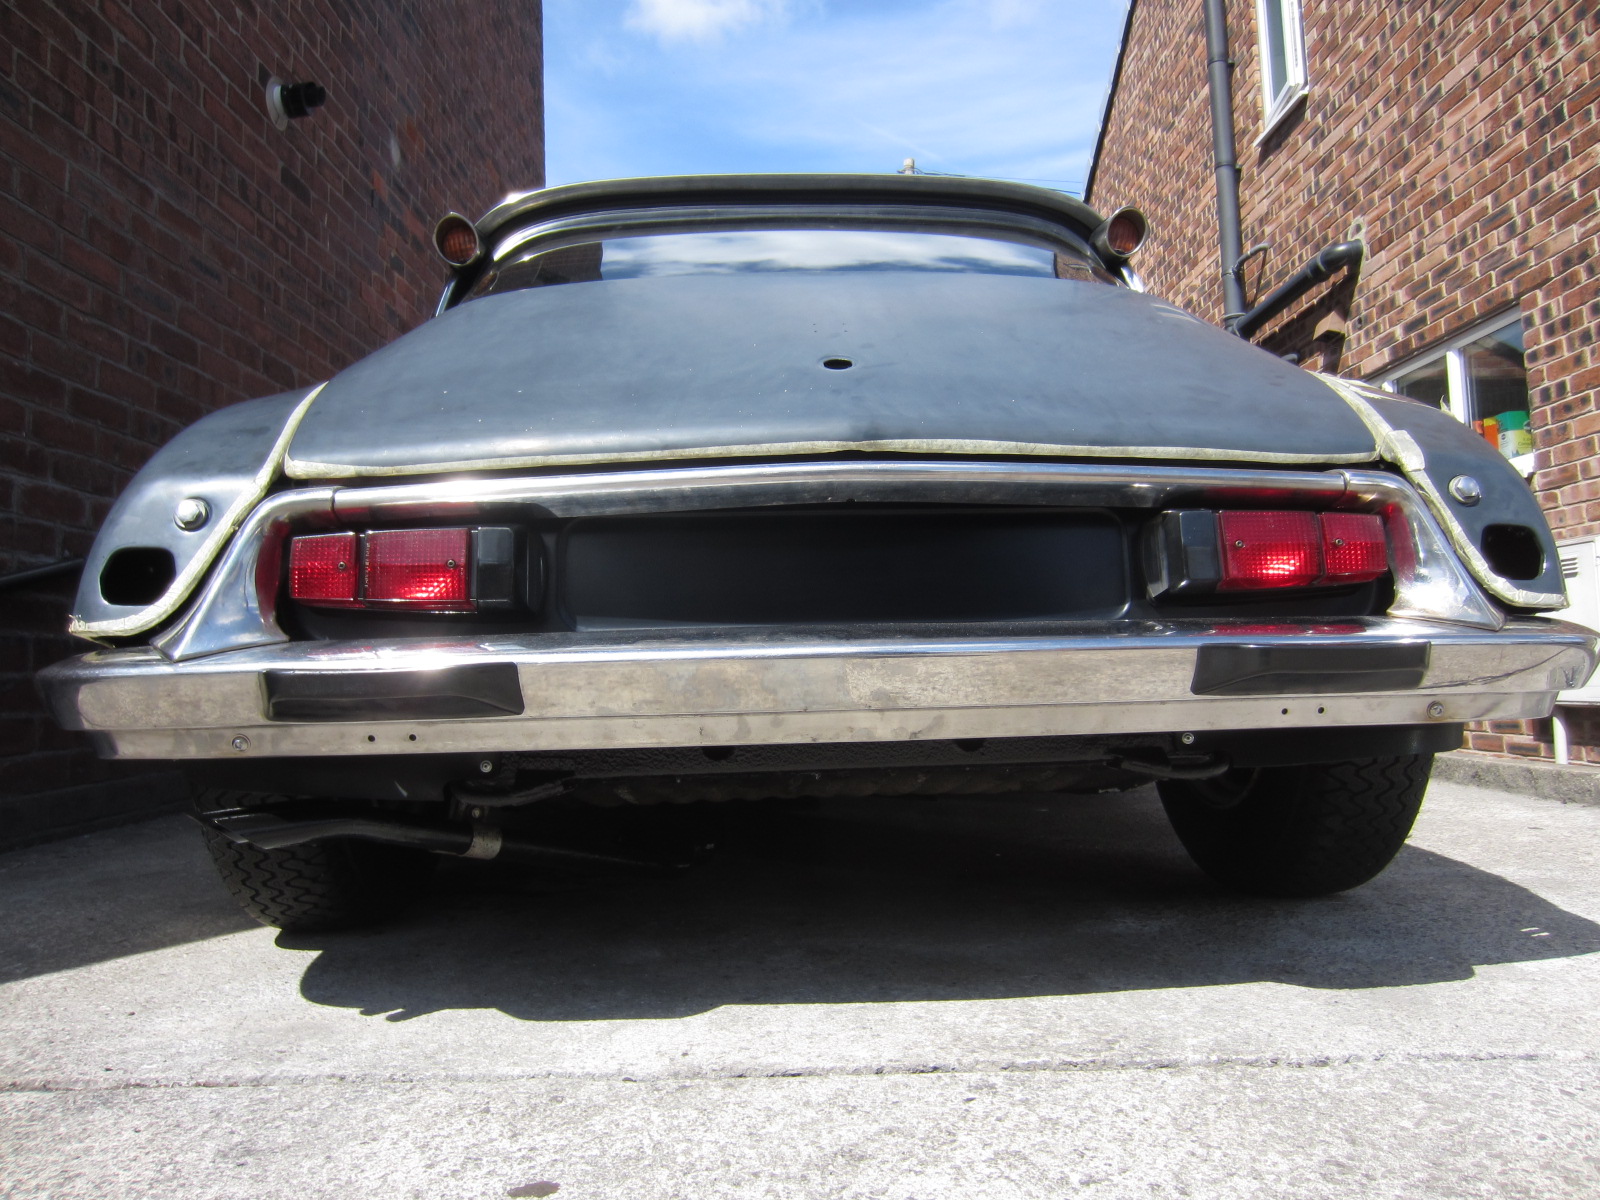
i have studied other photos of DS’s rear lights and they seem biased to the top, but none the less mine could benefit from some adjustment, albeit minor.
one thing, i felt the new rear bumper-iron-rubbers are a bit sloppy in the new replacement housings. From memory, when i took the bumper off. The metal ‘coller’ as i’ll call it on the bumper-iron was level with the rear panel and the oldl rubber just seemed tighter, filling the housing bore completely. With the new rubbers + housing, to get some rigidity you have to tighten them so much to compress the rubber, to expand it. The collar is drawn significantly ‘inward’ into it’s housing? This also takes the bumper possibly a little too close to other areas; ends of gutters, lower-wing area etc.
The sloppy bumper exacerbates the gapping around the lights. As until the bumper is rigid and supports itself. It’s drooping downwards, taking that cross-bar closer to the top of the lights.
Also one side seem to benefit from some additional packing to ‘balance’ out the compression. Couple of rubber discs made from ~3mm rubber sheet.
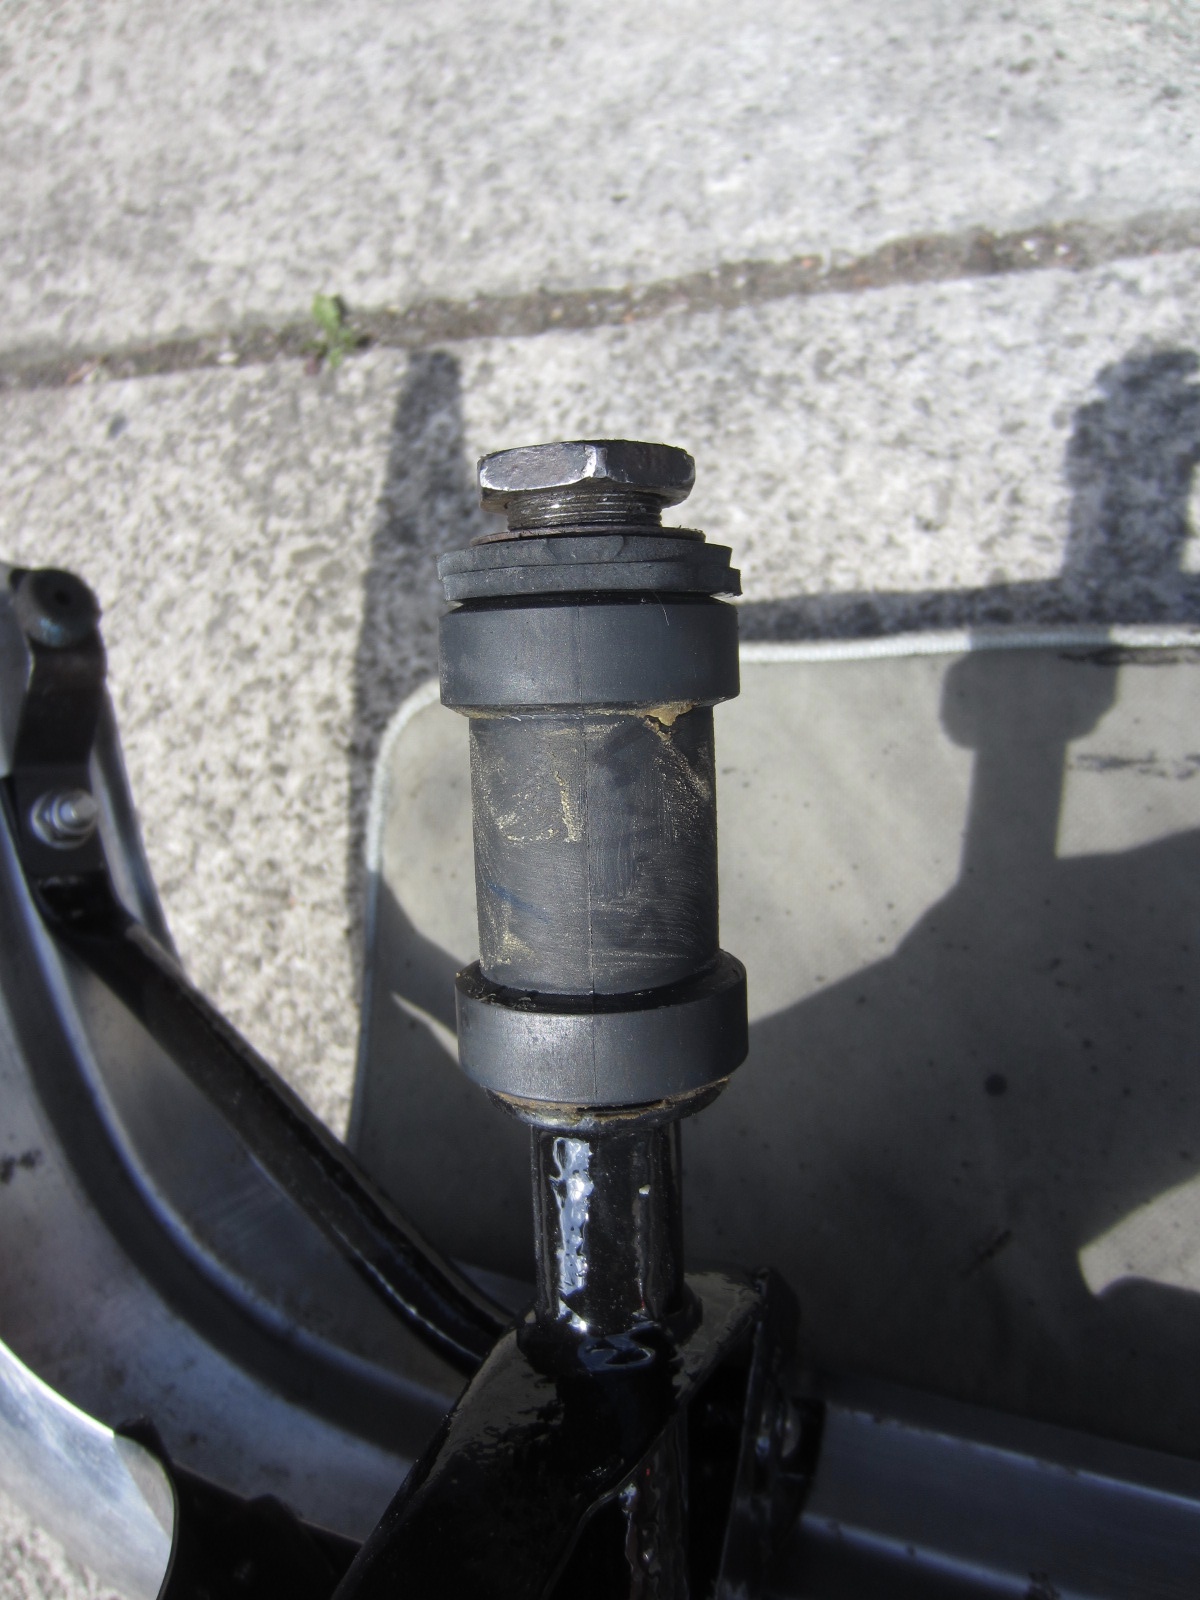
What i intend to do is modify it to get a better fit prior to sliding in the bumper-iron. I’ll pack out the centre of the rubber to get it the same OD as the ends. then wrap the whole thing in rubber so it’s a snug to tightish lubed fit in the housng. I’ll see how it goes?
Thats interesting about the brackets. I did think the tack welded bolt was a little crude, but seeing alot of the build ‘technique’ of the car, they seeemd plausable to come from the factory? Certainly reproduciton.
I have been welding a long time, but by no means an expert or particularly good at it. Sometimes i get lucky and surprise myself. Cleaner, easier access and thicker the metal, the easier i find it. I have an old sip mig, had it over 30 years. It’s a great machine, but i suspect a little tired now. periodically i dismantle it and clean up the terminations and have replaced the euro-torch on it. I’d like a tig too, but need the welding projects to justify the purchase.
Exhaust welding went ok. There was lots of small holes, paper thin metal, so i just decided to cut it all out, right back to good metal around the edge. It’s quite thick there, millimteter or so, so quite easy not to blow through, on lower settings. Tricky part was the radiused ends. I managed to form a reasonable fit, then tack and massage metal around, tack again and so on until it was OK. I then painted the lot with POR15, unsure how heat resistance it is, but i had some on the go so used that.
The whole affair doesn’t really need to last, it will get replaced. My front box seems to have numerous plates pop-riveted around it? I don’t think that its some sort of heatshield affair, so looks to be repairs? I dodn’t recall doing that at all, not something i’d do? I see the small section of ‘flexipipe’ i fitted from the front box to header from when it broke. So bit of a jigsaw.
I have been thinking about aligning the panels. Apart from the factory gaps, which may or may not be realisable? I was thinking of the way to go about it. I concluded best to start with the doors. I see these as most important for best alignment; locks, glass etc. Once those are aligned, align the front & rear to match, as best as possible? I don’t care if i don’t obtain factory specs, just not goofy of wtf-gapping?
I bled the brakes yesterday, it went well. Like you i simply ran a length of hose to the reservoire. Running on high suspension setting, got my mate to press the brake. I almost instantly got a solid run of clean lhm through the tube.
I susepct this is normal, but when the brakes were pressed the engine laboured as pressure was applied and the rear of the car lowered a slight amount?
But abnormally, afterwards. covering the car back up. I noticed lhm patch by os f.wheel. Looking underneath a massive patch of lhm on the deck. So somehting has been ruptured during the process. It wasn’t there before when the car has been run and suspension operated, but NOT the brakes? So suspect that has played a part in it? I’m going to leave that for now, i don’t have time to look at it properly. It doesn’t matter what ever it is, i’ll just sort it when i get back.
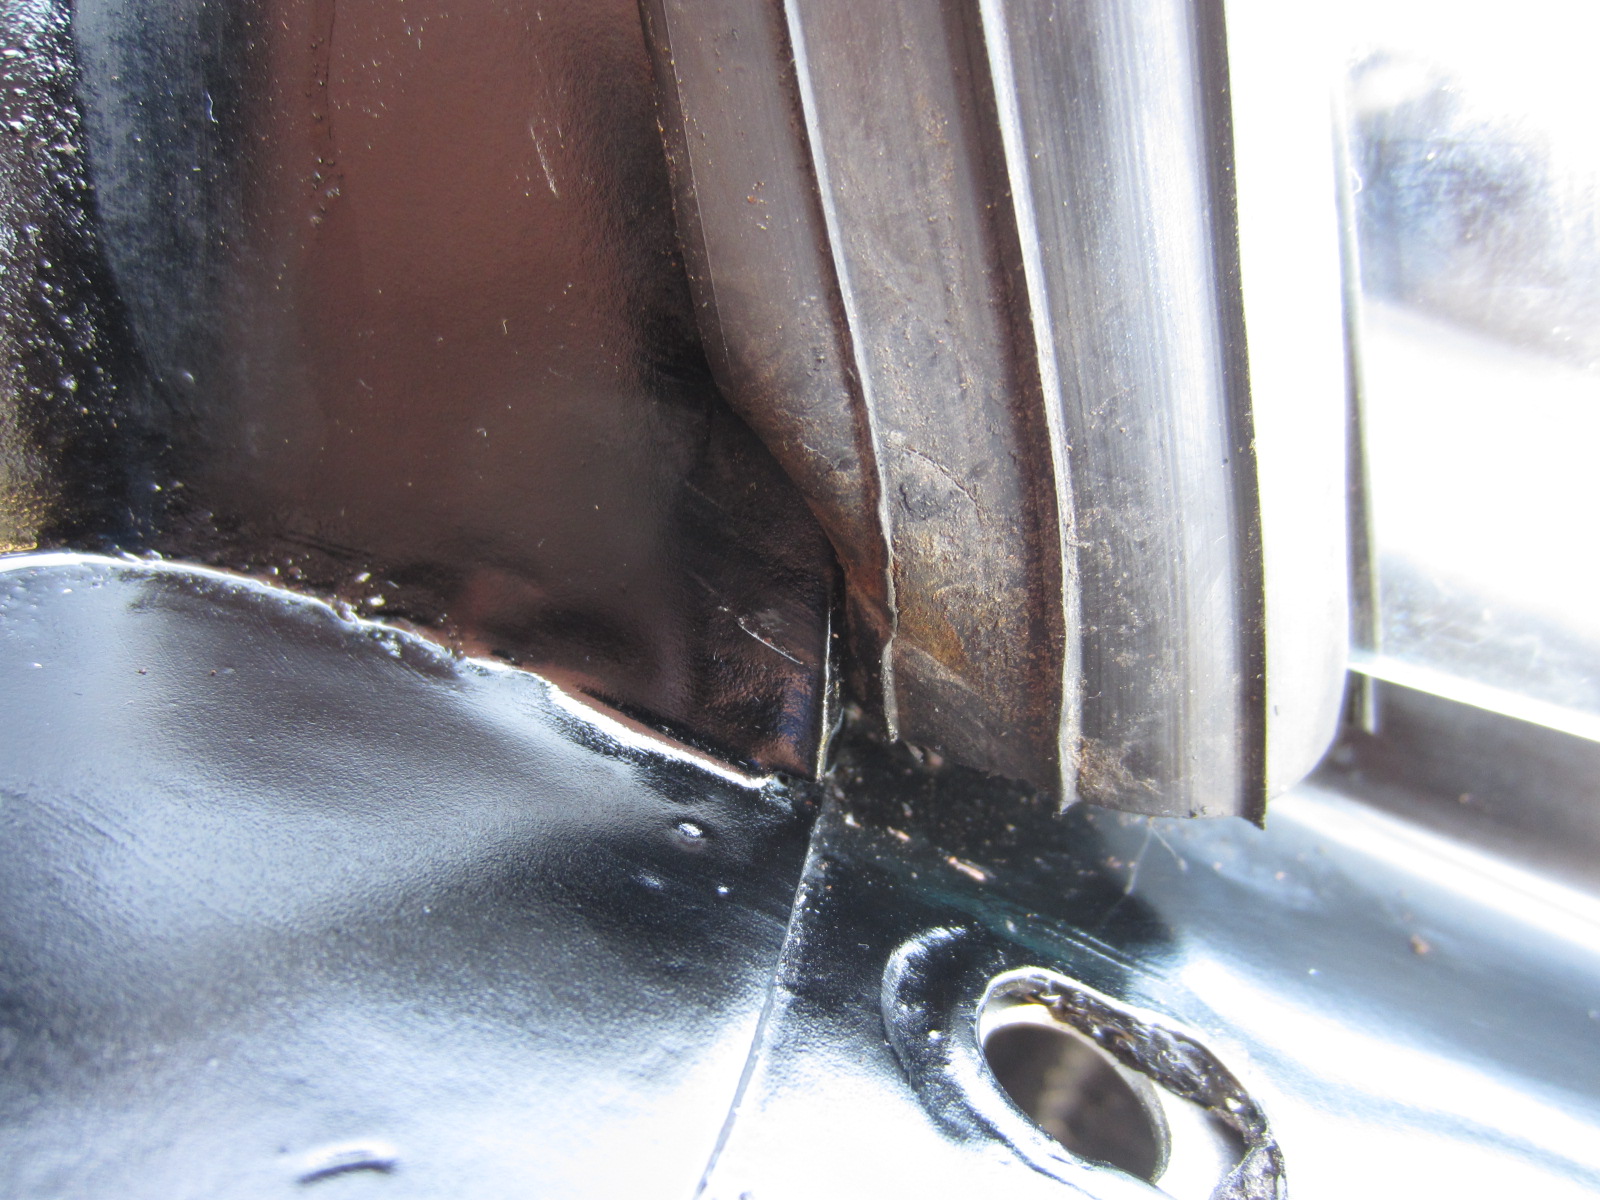
I think i’ve sorted this now. Problem i had was the upper seal was not seated properly in a few areas. Seems obvious now, but at the time, i thought the seal was in properly everywhere.
inspecting i found that the upright on the NS outer had not gone into the channel properly.
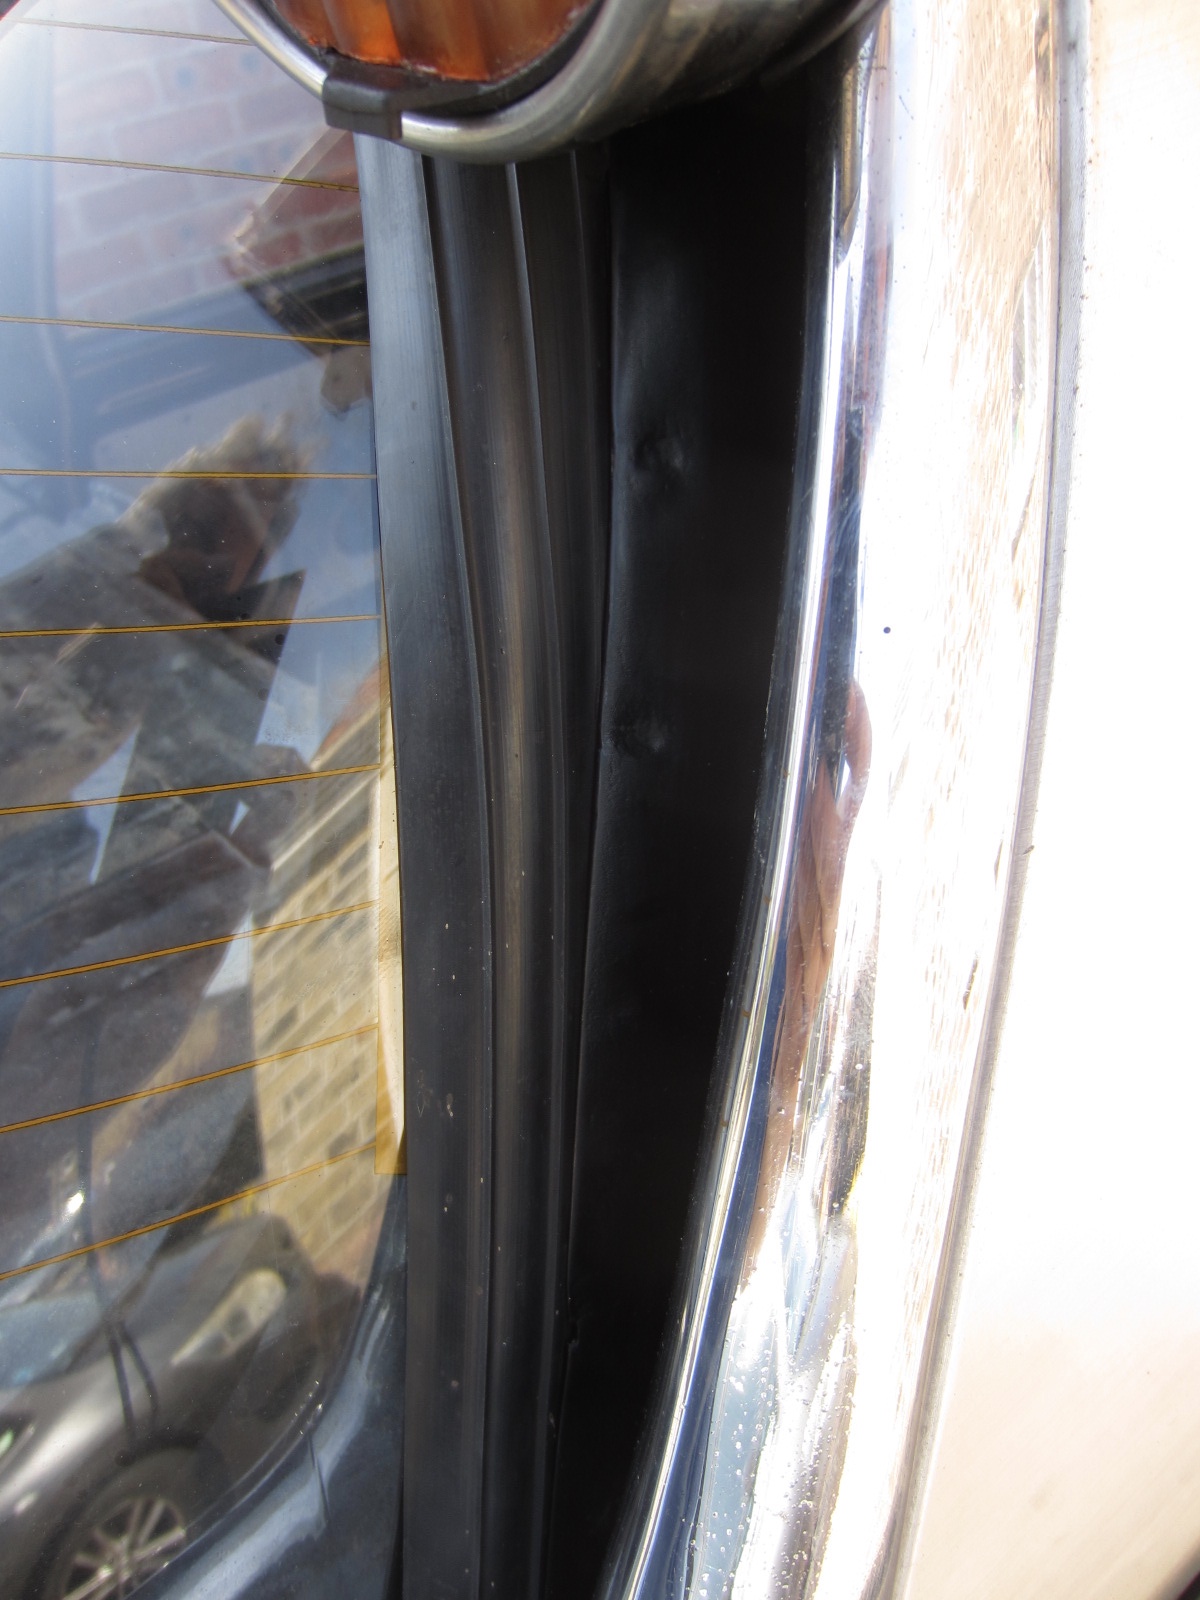
Then on both sides at the very base it had caught and not gone in properly.
NS
OS
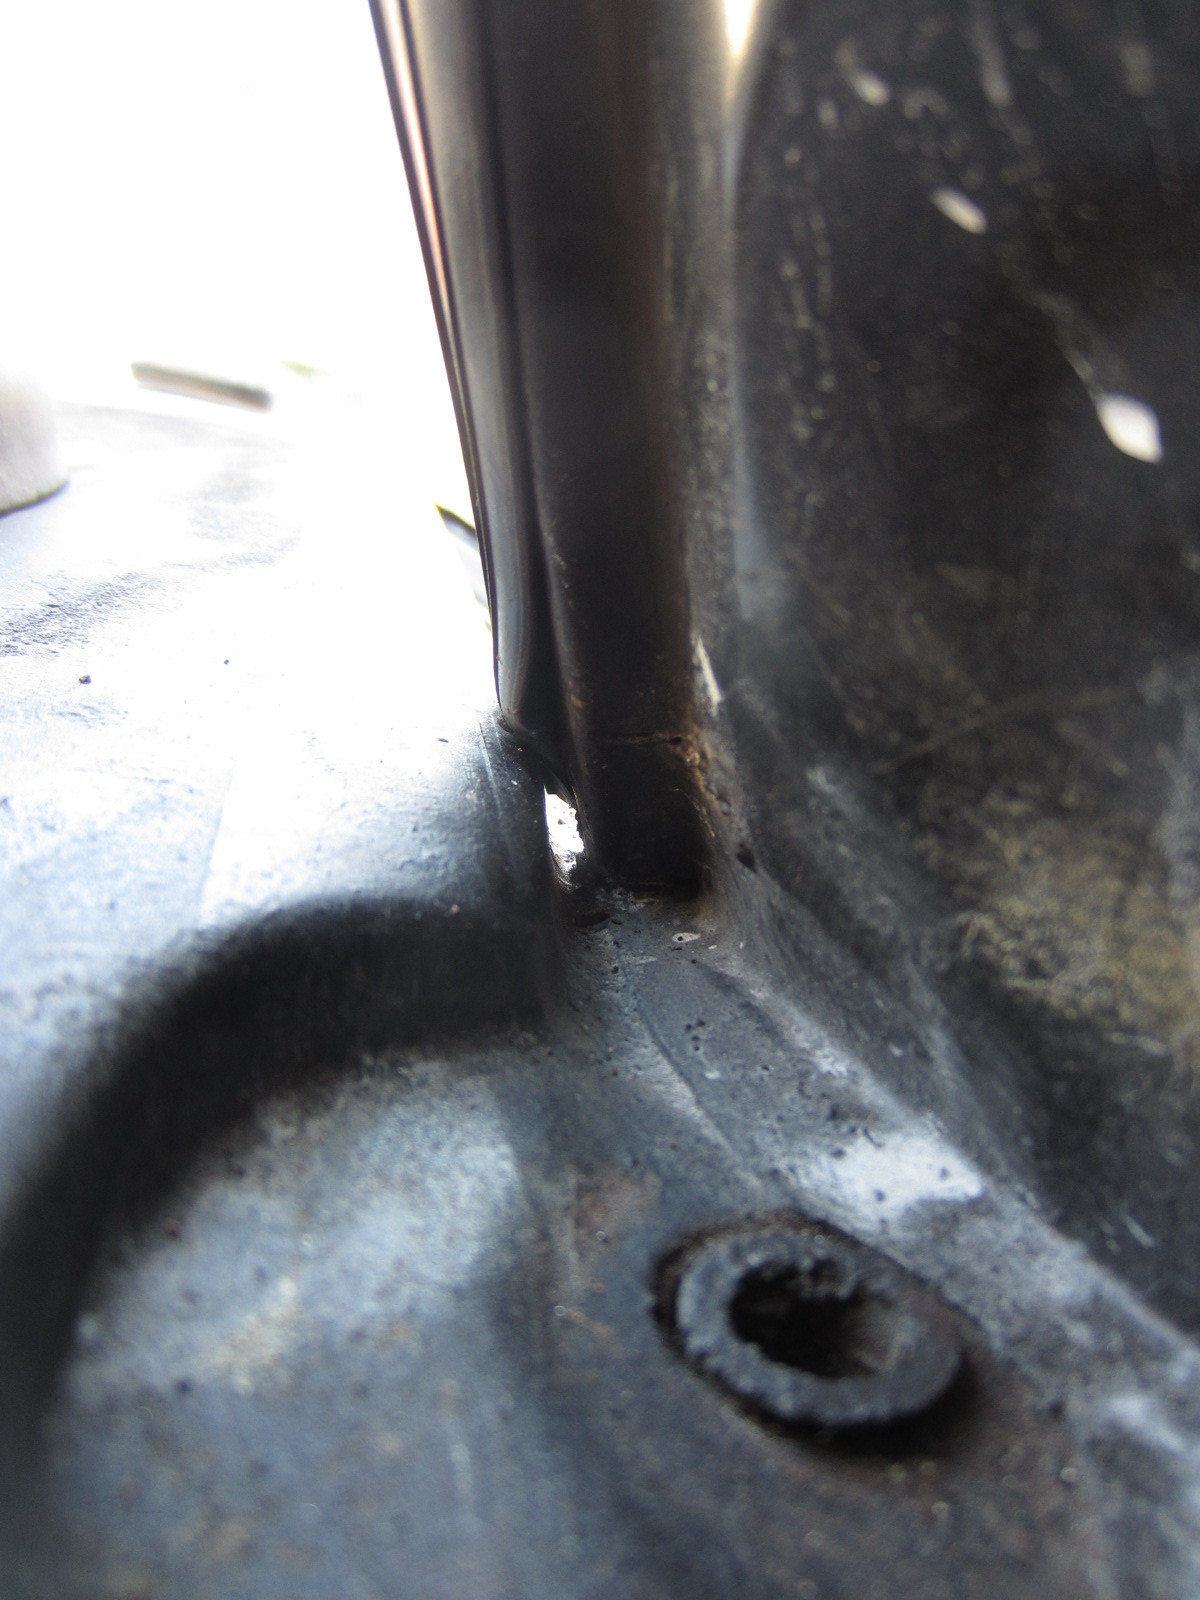
once i corrected this, had to remove the hinges for proper access, it made all the difference. Top run of the seal is now firm, no play. It allowed the screen to go in/up a little more. The gap on teh lower seal in the middle area is significantly reduced. I will need to add a strip of somehting to sit under the seal, but then i think it will be good. There is negligible gap now, it just needs a little more to compress againt the glass.
Those tapered metal brackets at the bottom are now moved inboard as much as possible, bolt is at the end of the mounting slot. So it is holding the glass ‘up’ as much as possible. This indiactes to me it must be positioned right?
It’s been a good exercise fitting the screen. I’m thinking for final fitment, i’ll fit the upper seal, without glass, then glue the lower seal in place, but leave the sides until centre is cured and stuck. Then trim lower with the upper seal in place for accurate trimming.
I also found another rear upper seal in my stash of seals/rubbers. Its used, but looks good. Still very rubbery and the ends are unmolested or damaged compared to my original seal. I’ll use this seal for final fitment of the rear screen.
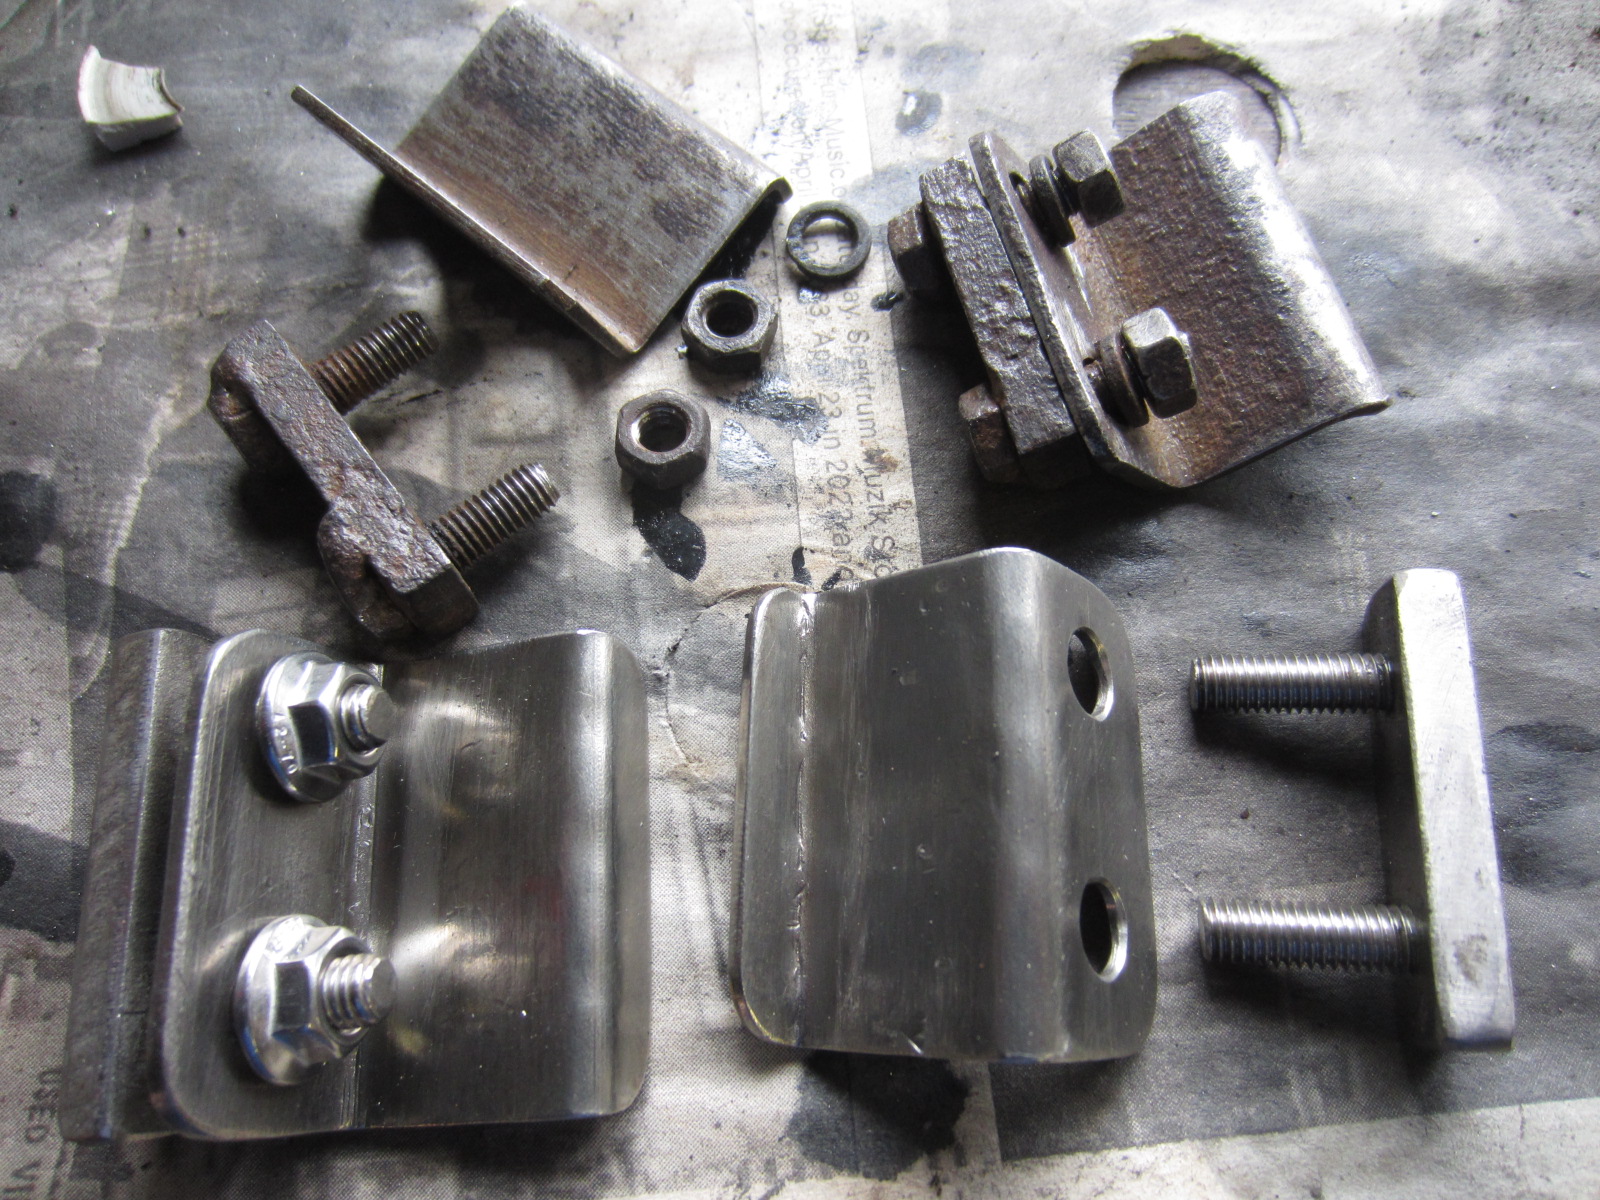
Additionally, those little brackets in the gutters for the wings had seen better days. So i fab’d up some stainless ones. But after fitting them, i didn’t like the studs + nuts protruding, looked ugly. So i removed the studs and fitted bolts, so you just see the hex’s on the gutter. looks a better ‘finish’.
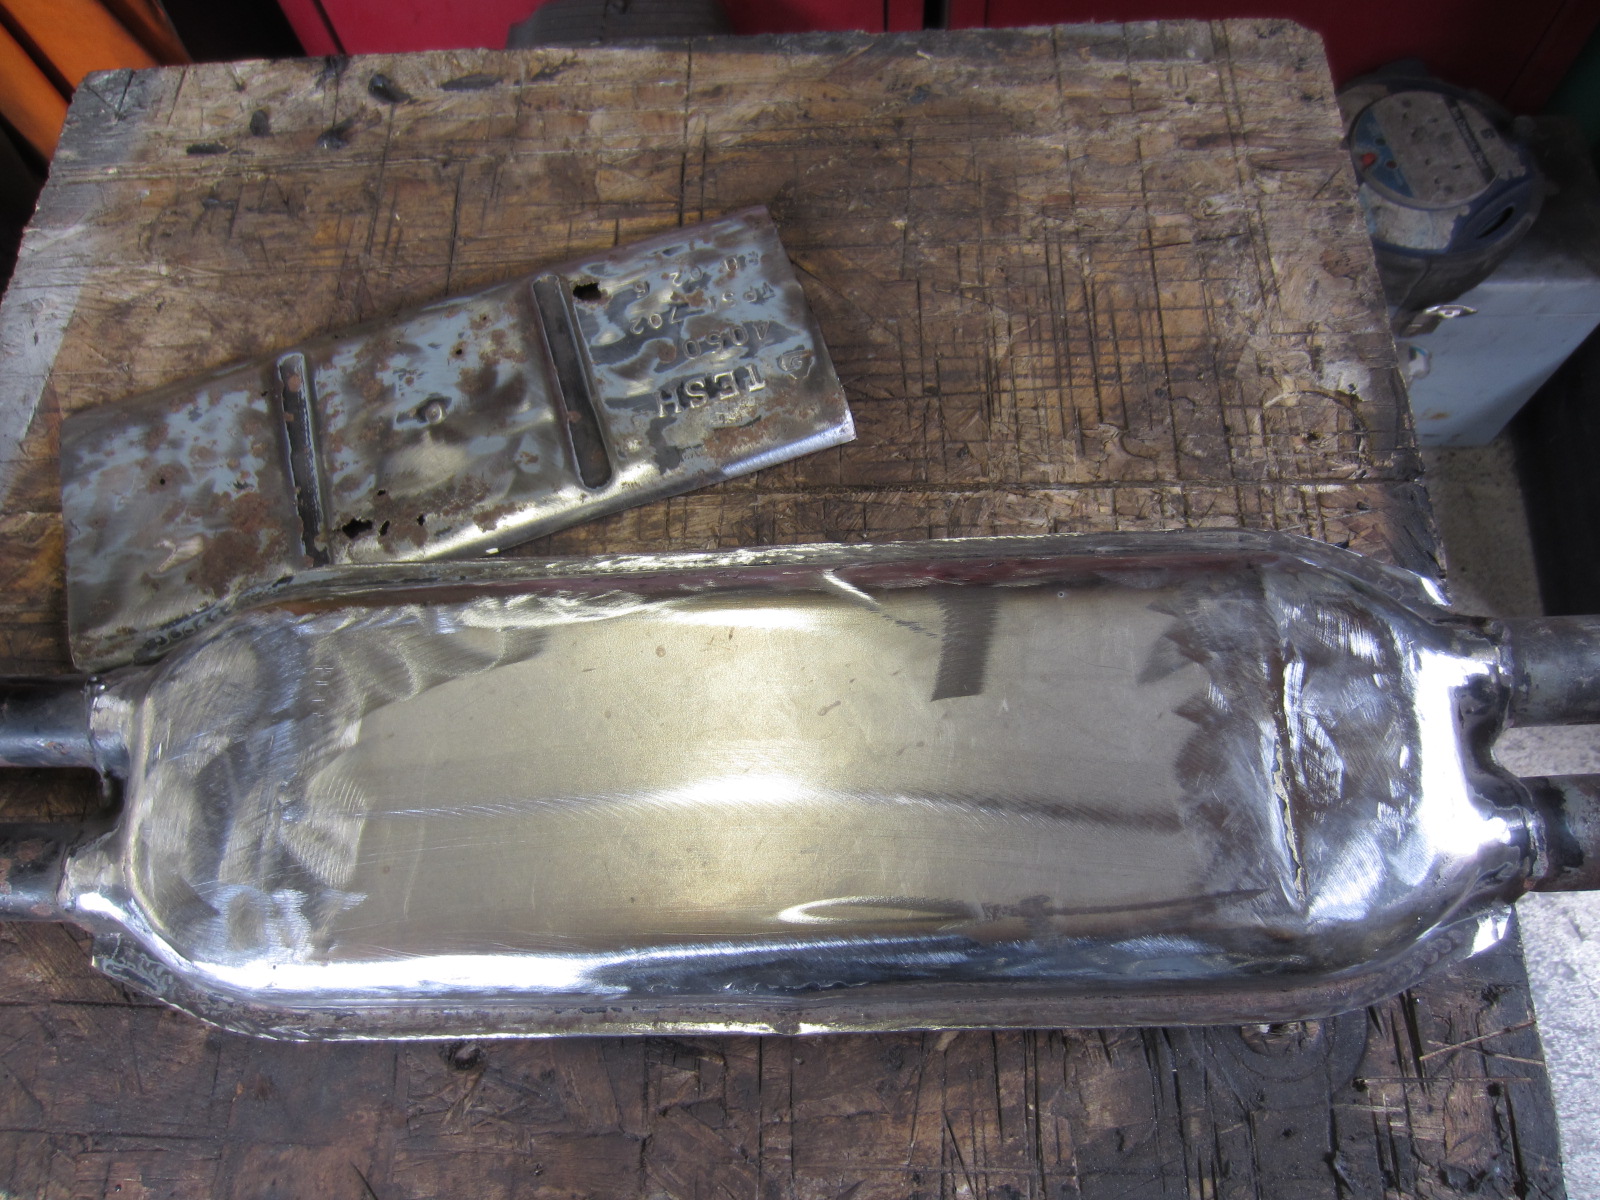
my rear silencer was holed on the lower panel. So i cut it all out and fab’d up some new metal. The actual tubes inside weren’t very good, but they’ll do for now. I intend to replace the whole system with a SS one. P.D. Gough is it that do stainless systems for the DS. I see they still advertise in the club mag.
On the subject of hinges routing around today in my many boxes of parts that came with the car looking for a better rubber hanging strap for the rear silencer i saw the other day. i came across x3 chrome hinges. So i have others i never new about. Unfortunately they are not much better than what is fitted. but at least i have some to possibly rework?
Still lots of small jobs to do. adjustment of the panels; rear wings & bootlid for better positioning. Adjust rear light-panel for better alignment. i have replaced the panel, with a new repro that came with the car. II had to rework the mountings for the lights to fit properly; wonky + gaps visible around light-unit base seal. NS is OK, but OS mounts too high and is noticeable. I’ll have to elongate the holes in the rear panel to allow it to sit lower and level it up.
I have a set of bnib oem pallas lenses, but i prefer the black ones. That plastic chrome looks cheap to me. Like those aftermarket dress-up lenses you see on boy racer cars.
Also on my hinges they do not sit flat aginst the boot at the tips. They are raised by a couple of mill or so. They are bolted hand tight, but i don’t see tightening them further will pull that part down. Maybe the boot has distorted a little with handling, flatting, just being off the car so long? It’s like they could do with another small fastner at the tip?
Rear mudflaps fitted to rear panel and closing panels. Interesting my car had front A-post flaps fitted to the rear panel. It confused me when i went to fit the same, just pulling them out the pack i bought from c.c. It was just odd and mounting seemed very goofy. Only when i looked into it, did i see that they were the wrong ones.
I think i’m about done with major works on the car. I’ll bleed the rear brakes tomorrow now i have 10m of screen-wash tubing. Correct the alignment of the light-panel and possibly better align the rear wings with bootlid. There is no fouling, but they are very close at the end compared to further up the gutter. Wing needs to come out and upward a little on both sides.
wow, that nisocote looks like a diy’ers dream? Benefits of poly 2k without all the iso’s. Brillaint.
I wonder if my HMG 2k is nisocote? I don’t think it is. I’ll aks the suppliers about it next time i’m over there. It comes in their own tins after mixing. Looking forward to seeing how that lot turns out.regarding air-line. i’m going to have to rig something like that up myself before i do anymore serious spraying. I too have lots of copper leftovers; 15, 22 & even some 28mm plus loads of solder joints. Just figure out the best layout. my workshop hasn’t any free wall space. It’s all benches, shelving, racking, toolboards. Every nook and cranny is utilised in some way. Probably run piping under the benches, at the rear out the way?
I saw on migwelding forum some folks plumb straight into the air-tank at the centre-plug. I suppose this gives a nice large bore straigth out? Seems a good idea, regulation done at the end of the line(s).
my hinges don’t look so bad now they’ve been cleaned and fitted. I have a single ally hinge and like you thought if i get another or a better pair (my single has damaged threads and missing studs). I could just leave ally, they’d match the brushed-ally panel, get chromed or possibly even powercoat chrome effect. It’s come along way since when ‘chrome’ powder/paint simply resembled silver paint?
i won’t bother with reproduction hinges for what they cost. I conclude they will be a poor fit and substandard casting/chrome. Most if not all non-original chrome-parts is crap now, on everything. Better to stay as i am and wait to drop on some better originals or leave as is?
I trial refitted my rear screen today, i say trial, it’s fitted, more for practice. It will come out again to finalise things. I went through D.961-4 procedure.
My original lower rubber appeared to be too short now on offering it back up to the car? I don’t know if these things can shrink with age or after removal or what, but it fell well short of the mark. The tapered ends didn’t even reach the inner c-post. Bizzare? Probably really strecthed around?
To remedy I have succesfully extended the seal by slicing the hacked-up ends with a surgical scalpel, guided with masking tape to give a good clean square end. I did the same with what appears to be a used repro (formed straight) seal i have. Glued the two together, too give a big looped seal.
i dabbed superglue to the tips of the profiles to hold then aligned. then using a very small spatula i opened up the seal slightly and layered in some black silicon and aided contact with some tape across the join and left overnight to properly cure. it’s turned out pretty OK and given me ‘new ends’ to attempt a trim myself. It should be good, all that silicon goodness oozed into those pores of the inside. I’ll take some photos of it tomorrow.
offering it up, i then cut the ends a couple of inches beyong the parcel shelf to give me plenty of seal to work with.
I haven’t glued it to the shelf, just used tape to hold it in place before the glass lay on it. I might stick it tomorrow with some double-sided tape. i don’t want to glue it until it’s properly trimmed and i’m 100% with everyhting. But it might help to be glued before trimming?
i have some issues that i’m not happy with the fitment and need to sort before final fitting of a new rear screen i have.
1. There isn’t much gap, if any at all between the OS base of the top-seal when fitted and the raised moulding of the parcel-shelf oppsite. It’s very difficult to impossible to shove the lower seal into the gap. Even lubed up. I suspect that is why my lower seal was so hacked? And the area was filled with a hard mastic type stuff, i’ve now removed.
I read that the lower seal should be full width there, shoved into that gap. And be trimmed from the inner-corner of the c-post, just to give the outer lip for the parcel-cover to fit under.
I’m thinking of ‘shaving’ the upper-seal a little at the base-outer-edge to allow the lower seal to get pushed in there. i have to check the thickness, see what is possible?
I repaired the NS upper seal channel at the base and payed attention to follow the original channel, leaving an appropriate gap there. The OS has been repaired, but i’ve left alone, as it is good metal. But the gap is significantly less than the NS. I saw this when it was all stripped back, it could be like that from manufacture? But hoped/concluded it’d be OK, seeing as that it was all together before?
2. the lower seal does not seal in the middle area of the screen. By the demister-slot and somewhat eitherside of. I can’t recall if it was sealed before i took it all a part? But i haved read an additional rubber strip is fitted to that area to push out the lower seal to help/make it seal. I think i might have to add soemhting here to do that?
How tight do you go down with those lower metal brackets? Do you tighten until the metal-faces of the brackets and lower channel meet or just enough to give a squeeze on the lower seal?
3. The whole affair seems sloppy? you can move the upper seal about a little in it’s track and on the glass. It appears to be fitted all the way up, as the lower brackets fit and the glass is resting on them. I don’t think it should be raised off them? Looking at how it fits i can’t imagine how it was ever water tight, but it was, never sufferred any water on the inside?
Apologies for the massive post, but a bit going on.
Are you saying that if the air is too warm the water-filter won’t do it’s thing? The filter away from the compressor is attempting to do that with ‘cooler’ air?
You got me thinking. I used to have my compressor just in the workshop, wheeled around to wherever. I had a declutter & tidy-up, moving the compressor to a permanent location under a bench to give me more floor space. I have noticed now, when it’s been running, it gets noticeably warm in that area. To the extent, I had concerns about it possibly overheating. My water-trap is bolted to the compressor, so right there at source.
I wonder if this new location is exacerbating the moisture i’ve suddenly been experiencing?
Anyway, working on the car today, i had the nearside rear wing off, upright on a cushion leaning against a wall on it’s edges currently protected with masking tape. A gust of wind dislodged it, toppling it onto the rear hub. It’s now dented from a wheel-stud with the paint damaged! Completely, totally and utterly pissed me off.
-
AuthorPosts