

Forum Replies Created
-
AuthorPosts
-
My DSuper5 is Bleu Delta with a pendant brake pedal.
Tha Safari will be Bleu Camargue with a mushroom brake pedal.Chris, do you have a 3d printer? Three dial dash?
I posted a conversion dial on thingiverse or cults you can print in translucent filament.
I have a spare if you want one.I’m biased, the 2.1 5 speed carby is the best model. I’ve upgraded my Safari to the same spec.
I’d need more than one skip. My collection of sticks and old mdf sheets would fill one. Being able to see my garage floor would be handy.
When I bought my left hand drive DSuper5, my wife and I agreed that saying “get over” was too vague. We settled on “white line” meaning I had drifted to the middle of the road and had to move back to the kerb.Time for a skip and a Swedish Death Clean.
Jamie did my dashboard. He supplies the powder to the powder coating firm.
I think it is black.
The coating had worn through where the keys had rubbed. Now I’ll keep the ignition key on its own.
Mine is BVM, if it doesn’t start, yes, you have to turn the key back to off. No idea how that works and no intention to find out. Springs and contacts all over the kitchen floor comes to mind.
I fiddled and messed with the clock. Soaked it in isopropyl alcohol 99%. It would run if the counterbalance was flicked with a sable paint brush, but not start.
It dawned on me I was powering it with an old style battery charger, not the car battery. Old battery chargers only have half wave rectification, hence the balance wheel just wobbled.
Why a soft paint brush? The shaft will bend if you look at it wrong, let alone with a finger.
I’ve made a new drawer for the middle of the dash. It has a tree wood facia, posh!After a few false starts, it’s in and all the wiring works.


Crude and effective, I blasted the sill spot welds with my Lidl plasma cutter.
Have you removed the relay and tested it?
One wire comes from the switch.
One wire goes to earth.
One wire, often thicker, is the 12v supply.
One wire, often thicker, goes to the headlamps.Take the relay out.
Connect a lead from one terminal to the battery.
Connect a lead to the other battery terminal.
Flick that wire across the other relay terminals in turn.
Hopefully you’ll hear the relay click on one of the terminals.
If you’ve found the two that activate the relay, one is earth, the other comes from the switch.
The other two terminal are power in, usually live, and power out to the headlamps.A relay is just an electro-mechanical switch that uses a small current to switch a large current.
If yours is kaput, replace it a cube relay.Terminal 85 is for the wire from the switch
Terminal 86 goes to earth
Terminal 30 is live feed
Terminal 87 goes to headlamp.Hopefully I’m not teaching you to suck eggs.
A shame you can’t secrete it under a bed.
Fresh oil sounds OK.
I don’t think I would seal it in case any moisture in the air drops out with change of temperature. A bit of mesh to stop mice?
Argon CO2 mix I think will be a waste of time and gas.Or.
My tank lasted 50 years, is there any need to worry?
Taking off a front wing is pretty straightforward. Left wing, it makes sense to mark thd wiring at the bulkhead. I use clip on numbers.
The crossbar that supports the air chute has to be undone on both sides. The swivelling head lamp cable needs to be split at the plastic joiner.
The feeds to the horns needs to be undone.
Any clamp holding the fresh air tubing at the front needs to undone and the tubing pulled off.
Similarly at the fan.
Undo the bolt in the wheel arch, just by the end of the bumper.
Undo the bolt at the front of the wing.
Wiggle out the bonnet catch cable.
Grab hold of the wing by the wheel arch and front of wing and pull.
The wing is located on two large pins at the rear.
It is heavy.
Don’t stand it upright, it will fall over.
Lay it on the lawn or blankets.Why do you want to take the wing off?
Hello, unless you’re very lucky, you are opening a can of worms.
If you want it done well, it is going to cost, a lot.
A skim of filler and a blow over may hold it back for a while.
I’d be inclined to leave it alone and use the time to save some money, then get it done properly.Did you get it sorted?
Are they swivelling or snivelling?Plus this, that Paul posted in another thread.
The rest of the headlamp assembly.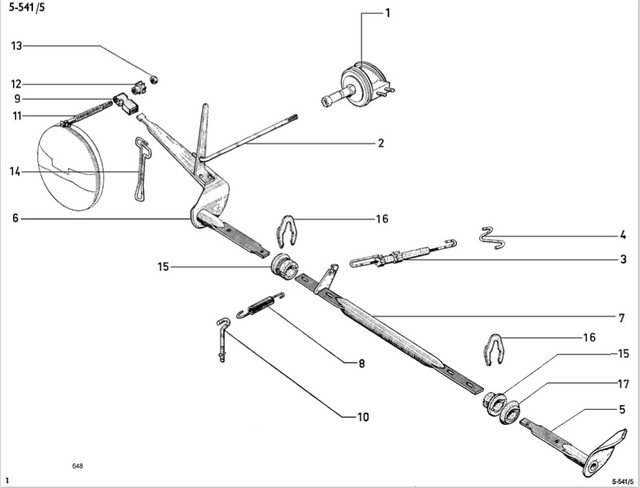
Plus this, that Paul posted in another thread.
Duplicate post.
-
AuthorPosts